IATA stands for International Air Transport Association. It is a trade association of the world's airlines. IATA was founded in 1945 and is headquartered in Montreal, Canada.
IATA's mission is to represent the interests of the airline industry and to promote safe, secure, and sustainable air travel. IATA does this by developing standards and regulations for the airline industry, providing training and education, and advocating for the interests of airlines with governments and other organizations.
IATA is best known for its development of the IATA airline codes. These codes are three-letter codes that are used to identify airlines. For example, the IATA code for Qatar Airways is QR. IATA airline codes are used in a variety of applications, including flight booking, baggage tracking, and airport signage.
IATA also develops standards for a variety of other aspects of the airline industry, including passenger and cargo handling, aircraft maintenance, and fuel efficiency. IATA also provides training and education to airline employees on a variety of topics, including safety, security, and customer service.
IATA is a powerful voice for the airline industry. It works with governments and other organizations to advocate for policies that are beneficial to airlines. IATA also works to promote the safe and secure operation of the global air transportation system.
Here are some of the benefits of IATA:
Standardization: IATA develops standards for a variety of aspects of the airline industry, which helps to ensure that airlines operate in a safe and efficient manner.
Training and education: IATA provides training and education to airline employees on a variety of topics, which helps to improve the safety and security of air travel.
Advocacy: IATA is a powerful voice for the airline industry, and it works with governments and other organizations to advocate for policies that are beneficial to airlines.
Research and development: IATA conducts research and development on a variety of topics related to air travel, which helps to improve the safety and efficiency of the industry.
Big data is a term used to describe the large and complex datasets that are difficult to process using traditional data processing methods. Big data is often characterized by its volume, velocity, and variety.
Volume: Big data is often very large, with datasets that can reach petabytes or even exabytes in size.
Velocity: Big data is often generated at high speeds, with new data being added to the dataset constantly.
Variety: Big data can come in a variety of formats, including structured, semi-structured, and unstructured data.
Big data is becoming increasingly important as organizations collect and store more data. Big data can be used to improve decision-making, identify trends, and develop new products and services.
There are a number of challenges associated with big data, including:
Data collection: It can be difficult and expensive to collect big data.
Data storage: Big data requires a lot of storage space.
Data processing: Traditional data processing methods are not able to process big data efficiently.
Data analysis: Big data can be difficult to analyze.
Data security: Big data is often sensitive and requires strong security measures.
Despite the challenges, big data is a powerful tool that can be used to improve businesses and organizations.
Here are some of the benefits of big data:
Improved decision-making: Big data can be used to improve decision-making by providing organizations with insights into their customers, operations, and markets.
Identify trends: Big data can be used to identify trends that would not be visible with traditional data analysis methods.
Develop new products and services: Big data can be used to develop new products and services that meet the needs of customers.
Reduce costs: Big data can be used to reduce costs by improving efficiency and identifying areas for improvement.
Increase revenue: Big data can be used to increase revenue by targeting customers with relevant products and services.
If you are looking to take advantage of big data, I recommend that you start by understanding your needs and requirements. Once you have a good understanding of your needs, you can start to collect and analyze big data.
There are a number of resources available to help you with big data. Here are a few of them:
The Big Data Association: The Big Data Association is a non-profit organization that provides resources and training on big data.
The Hadoop Foundation: The Hadoop Foundation is a non-profit organization that promotes the use of Hadoop, an open-source big data platform.
The Cloudera Academy: The Cloudera Academy is a training platform that offers courses on big data and Hadoop.
Apache Zeppelin, JupyterLab, and Polynote are all interactive notebooks that allow you to write and run code, visualize data, and collaborate with others. They are all open-source and free to use.
Here is a comparison of the three notebooks:
Feature
Apache Zeppelin
JupyterLab
Polynote
Programming languages
Python, Scala, R, SQL, Hive, Pig, etc.
Python, R, Julia, Scala, JavaScript, etc.
Python, R, SQL, Scala, etc.
Visualizations
Charts, graphs, tables, images, etc.
Charts, graphs, tables, images, etc.
Charts, graphs, tables, images, etc.
Collaboration
Yes
Yes
Yes
Extensibility
Plugins
Extensions
Plugins
Community support
Large and active
Large and active
Growing
Apache Zeppelin is a web-based notebook that is designed for data scientists and engineers. It is known for its flexibility and extensibility. Zeppelin has a large number of plugins that can be used to add new features and functionality.
JupyterLab is a web-based notebook that is designed for data scientists, researchers, and educators. It is known for its ease of use and its rich feature set. JupyterLab is the successor to the popular Jupyter Notebook.
Polynote is a web-based notebook that is designed for data scientists and engineers. It is known for its speed and its ability to handle large datasets. Polynote is a newer notebook, but it is growing in popularity.
The best notebook for you will depend on your specific needs and requirements. If you are looking for a flexible and extensible notebook, Apache Zeppelin is a good choice. If you are looking for an easy-to-use notebook with a rich feature set, JupyterLab is a good choice. If you are looking for a fast notebook that can handle large datasets, Polynote is a good choice.
Here are some additional things to consider when choosing an interactive notebook:
Your programming language: Make sure the notebook supports the programming languages you need to use.
Your data visualization needs: Consider the types of visualizations you need to create and the features that are important to you.
Your collaboration needs: If you need to collaborate with others, make sure the notebook supports collaboration.
Your extensibility needs: If you need to add new features or functionality to the notebook, make sure it is extensible.
The community support: Make sure the notebook has a large and active community that can provide support and resources.
Apache NiFi is an open-source, scalable, distributed data integration platform. It is used to automate the flow of data between systems. NiFi can be used to process data in real time or in batches. It can also be used to integrate data from a variety of sources, including databases, files, and streaming data.
NiFi is a powerful tool that can be used to solve a variety of data integration problems. It is a good choice for organizations that need to process large amounts of data quickly and efficiently.
Here are some of the features of Apache NiFi:
Scalability: NiFi is scalable and can be used to process large amounts of data.
Distributed: NiFi is distributed and can be deployed on a cluster of machines.
Flexibility: NiFi is flexible and can be used to process data in a variety of ways.
Extensibility: NiFi is extensible and can be customized to meet specific needs.
Community support: NiFi has a large and active community that provides support and resources.
If you are looking for a powerful and flexible data integration platform, Apache NiFi is a good choice.
Here are some of the use cases of Apache NiFi:
Data ingestion: NiFi can be used to ingest data from a variety of sources, including databases, files, and streaming data.
Data processing: NiFi can be used to process data in real time or in batches.
Data routing: NiFi can be used to route data to different destinations, such as databases, files, and applications.
Data transformation: NiFi can be used to transform data by changing its format or structure.
Data enrichment: NiFi can be used to enrich data by adding additional information to it.
Data anonymization: NiFi can be used to anonymize data by removing sensitive information from it.
If you are looking to solve a data integration problem, Apache NiFi is a good place to start.
SSH (Secure Shell) is a network protocol that allows you to securely connect to a remote computer. It is often used to connect to Linux or Unix servers from a Windows computer.
To establish an SSH connection between Windows and Linux, you need to:
Install an SSH client on your Windows computer. There are a number of SSH clients available, such as PuTTY and KiTTY.
Open the SSH client and connect to the Linux server. You will need to specify the IP address or hostname of the Linux server, as well as the username and password for the account you want to use.
Once you are connected, you can start using the Linux server as if you were sitting in front of it.
Here are the steps on how to connect to a Linux server from a Windows computer using PuTTY:
Download and install PuTTY from the PuTTY website.
Open PuTTY and enter the IP address or hostname of the Linux server in the Host Name (or IP address) field.
In the Port field, enter 22. This is the default port for SSH.
Click on the Open button.
PuTTY will prompt you for the username and password for the account you want to use. Enter the username and password and click on the Enter button.
Once you are connected, you will see a PuTTY terminal window. You can start using the Linux server as if you were sitting in front of it.
Here are some of the benefits of using SSH:
Security: SSH is a secure protocol that encrypts all data that is transmitted between the client and the server.
Ease of use: SSH is a relatively easy protocol to use. Once you have installed an SSH client, you can connect to a remote server with just a few clicks.
Compatibility: SSH is a cross-platform protocol that can be used to connect to servers running Linux, Unix, and Windows.
If you need to connect to a Linux server from a Windows computer, SSH is a good option. It is a secure and easy-to-use protocol that is compatible with most operating systems.
Connecting from windows to linux
Login on the windows node
Generate a key-gen public and private key
Copy the generated public key to the linux node.
The public key is copied or appended under
~/User.name/.ssh/authorized_keys
Items to consider:
Make sure ssh server and agent is installed and configured on both machines
Connecting from linux to windows
Login on the linux node
Generate a key-gen public and private key
Copy the generated public key to the windows node.
Creating and setting up of mail server on Windows is not as difficult as perceived. But if you are looking for open-source free software to create mail/SMTP server, you certainly have very few choices. One of the open-source software for Windows mail servers is hMailServer. It installs just like any other software, but configuration could be tricky. There is one more software in my knowledge for Windows, which is free, is Axigen.
In this tutorial, you will learn to install and configure hMailServer. In some other tutorial, I will discuss Axigen as well.
a Windows Machine. It could be Windows 10, Windows Server 2016, 2019, or any other Windows edition.
I recommend getting Windows Server from Turnkey Internet or anywhere you like, just make sure port 25 is open. Best thing is about turnkey is you can buy and apply Windows license from somewhere and pay them just for VPS. This might save some money for you.
Testing for Open Port 25 on Windows
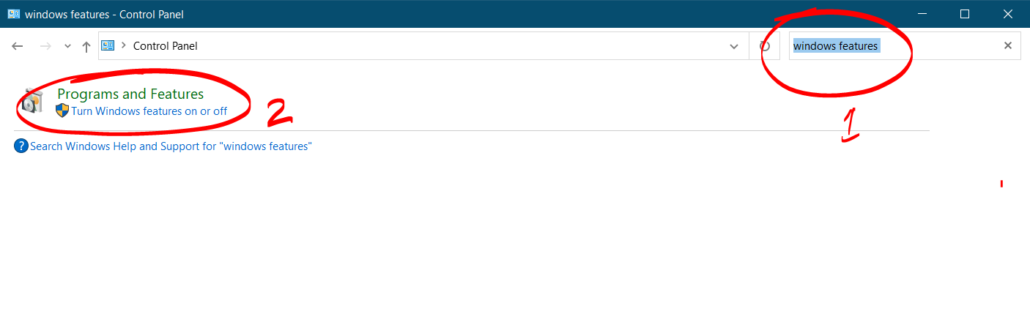
On Windows 10 go to control panel and search for “Windows Features”
Now go to Turn Windows features on or off and look for telnet. Check the box in front of it and click OK.
After that open command prompt and type
1
telnet smtp.gmail.com 25
If you get connected message then all is well, otherwise your port 25 is blocked.
Getting & Installing hmailserver
To get hmailserver just go their website and download. Install it as any software and follow the screenshots below. During installation you will be asked to create password. This password will be needed every time you start hmailserver.
Configuring hMailServer
After installation on first run you will be asked for password to start.
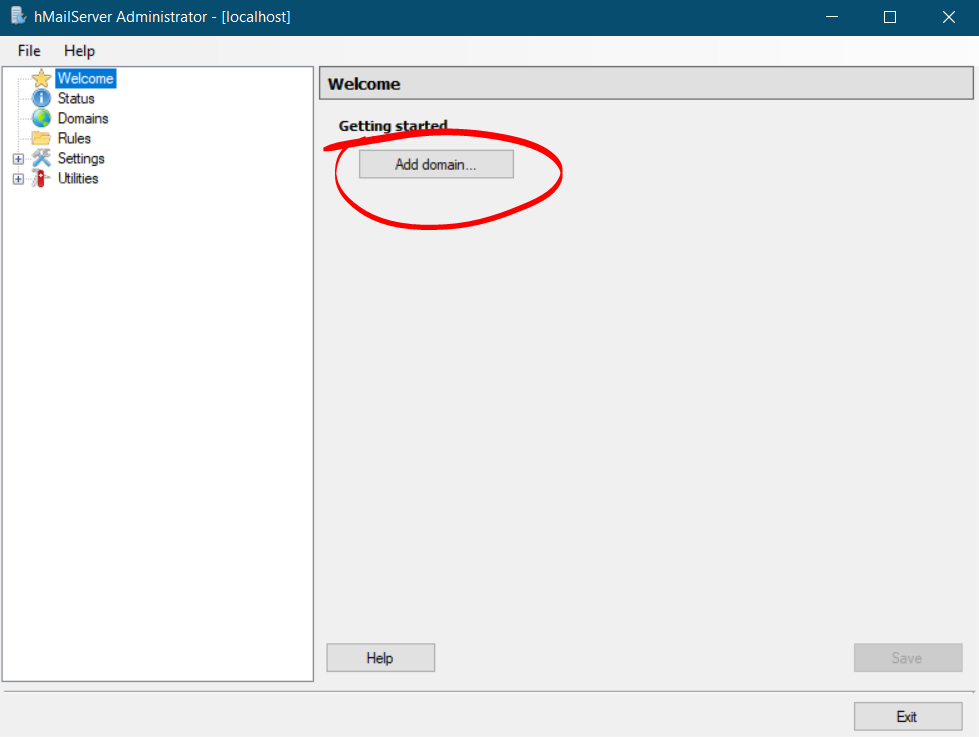
Adding Domain
After that, on next screen add domain as follows.
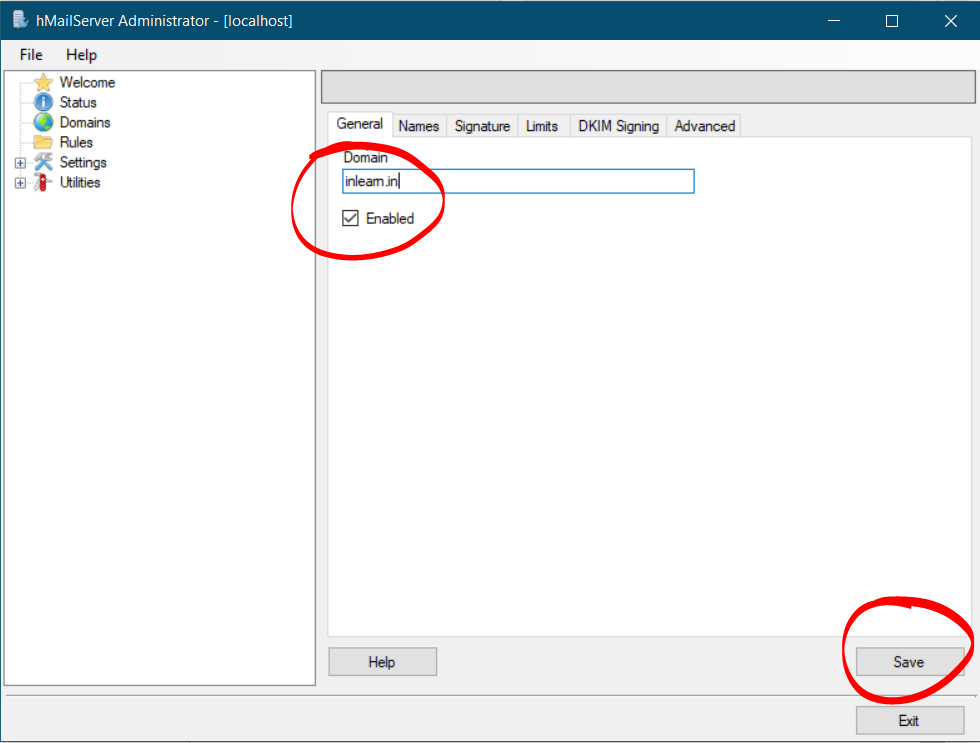
Next type the domain name and save.
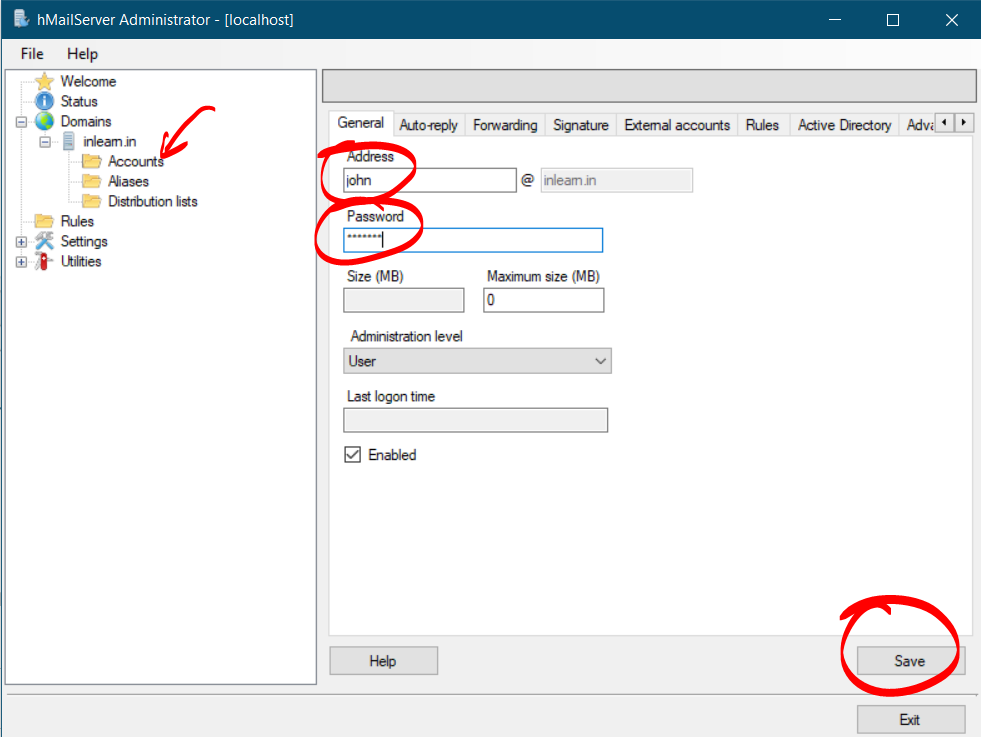
Adding Accounts
After that, you need to add account for the domain. Simply go to Accounts and then Add.
On following screen enter username and password, then save.
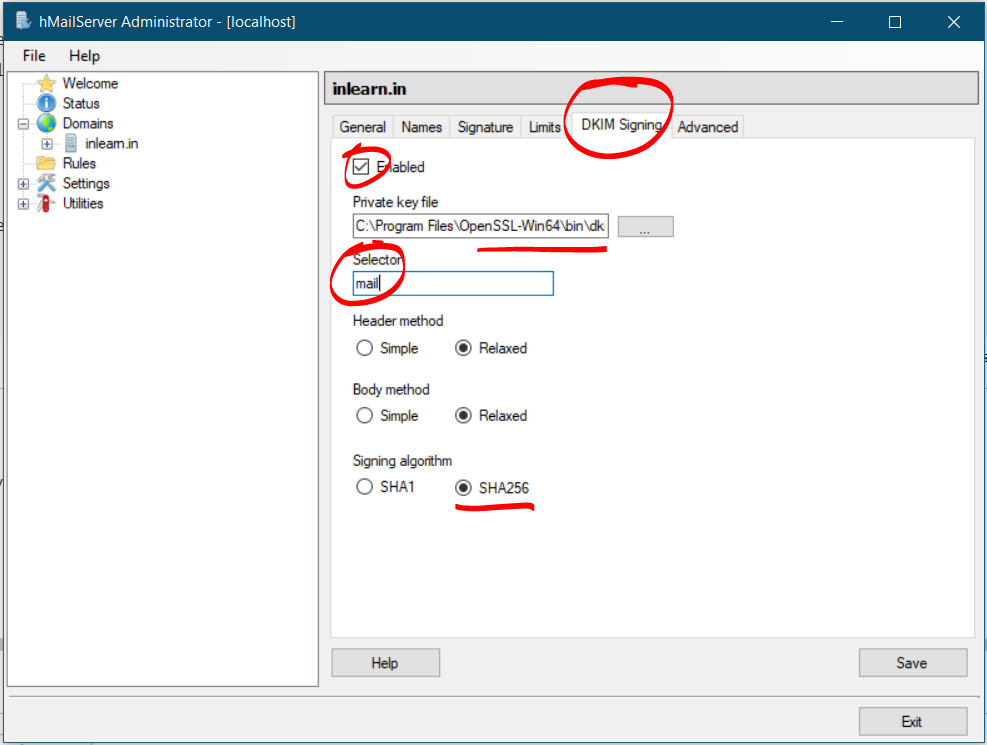
Generate and add DKIM key to hMailServer
In order to generate DKIM key to hMailServer, you need openssl key generator. Just download from the following link
Now you will see two files at C:\Program Files\OpenSSL-Win64\bin. One is dkim.private.key and another dkim.public.key. Next, you need to tell hMailServer the location of dkim.private.key and the selector. Here you can use any alphanumeric as a selector but I am going to use mail
Next, you open dkim.public.key in notepad and follow the steps to create DKIM record for your domain.
Configuring DNS records
You need to create following DNS records in your domain. Login to your domain registrar and look for DNS management.
After this, you can test your email server. For testing, I am going to use Thunderbird. You can also download any desktop based software to test. You can also check hmailserver outlook settings tutorial if you wanted to use outlook with hmailserver.
Enter the following SMTP details in the software.
Host
localhost
User
user@yourdomain.com
Password
You chose
Port
587
TLS
None
After that, you can send test email to your Gmail.
Conclusion
Creating MailServer on Windows would have been tedious task, but thanks to hmailserver it’s super easy. This is boon for the people, who are unable to get with nitty-gritty of Linux.