Functions are common to all programming languages, and it can be defined as a block of re-usable code to perform specific tasks. But defining functions in Python means knowing both types first: built-in and user-defined. Built-in functions are usually a part of Python packages and libraries, whereas user-defined functions are written by the developers to meet certain requirements. In Python, all functions are treated as objects, so it is more flexible compared to other high-level languages.
In this article, we will focus on the user-defined functions in Python. To completely understand the concept, we will learn how they can be implemented by writing code examples. Let’s have a look at other important concepts before jumping into coding.
Importance of user-defined functions in Python
In general, developers can write user-defined functions or it can be borrowed as a third-party library. This also means your own user-defined functions can also be a third-party library for other users. User-defined functions have certain advantages depending when and how they are used. Let ‘s have a look at the following points.
- User-defined functions are reusable code blocks; they only need to be written once, then they can be used multiple times. They can even be used in other applications, too.
- These functions are very useful, from writing common utilities to specific business logic. These functions can also be modified per requirement.
- The code is usually well organized, easy to maintain, and developer-friendly. Which means it can support the modular design approach.
- As user-defined functions can be written independently, the tasks of a project can be distributed for rapid application development.
- A well-defined and thoughtfully written user-defined function can ease the application development process.
Now that we have a basic understanding of the advantages, let’s have a look at different function arguments in Python.
Function arguments in Python
In Python, user-defined functions can take four different types of arguments. The argument types and their meanings, however, are pre-defined and can’t be changed. But a developer can, instead, follow these pre-defined rules to make their own custom functions. The following are the four types of arguments and their rules.
1. Default arguments:
Python has a different way of representing syntax and default values for function arguments. Default values indicate that the function argument will take that value if no argument value is passed during function call. The default value is assigned by using assignment (=) operator. Below is a typical syntax for default argument. Here,
msg parameter has a default value Hello!.Function definition
def defaultArg( name, msg = "Hello!"):
Function call
defaultArg( name)
2. Required arguments:
Required arguments are the mandatory arguments of a function. These argument values must be passed in correct number and order during function call. Below is a typical syntax for a required argument function.
Function definition
def requiredArg (str,num):
Function call
requiredArg ("Hello",12)
3. Keyword arguments:
Keyword arguments are relevant for Python function calls. The keywords are mentioned during the function call along with their corresponding values. These keywords are mapped with the function arguments so the function can easily identify the corresponding values even if the order is not maintained during the function call. The following is the syntax for keyword arguments.
Function definition
def keywordArg( name, role ):
Function call
keywordArg( name = "Tom", role = "Manager")
or
keywordArg( role = "Manager", name = "Tom")
4. Variable number of arguments:
This is very useful when we do not know the exact number of arguments that will be passed to a function. Or we can have a design where any number of arguments can be passed based on the requirement. Below is the syntax for this type of function call.
Function definition
def varlengthArgs(*varargs):
Function call
varlengthArgs(30,40,50,60)
Now that we have an idea about the different argument types in Python. Let’s check the steps to write a user-defined function.
Writing user-defined functions in Python
These are the basic steps in writing user-defined functions in Python. For additional functionalities, we need to incorporate more steps as needed.
- Step 1: Declare the function with the keyword
deffollowed by the function name. - Step 2: Write the arguments inside the opening and closing parentheses of the function, and end the declaration with a colon.
- Step 3: Add the program statements to be executed.
- Step 4: End the function with/without return statement.
The example below is a typical syntax for defining functions:
def userDefFunction (arg1, arg2, arg3 ...):
    program statement1
    program statement3
    program statement3
    ....
   return;
Let’s try some code examples
In this section, we will cover four different examples for all the four types of function arguments.
Default arguments example
The following code snippet represents a default argument example. We have written the code in a script file named
defArg.py
Listing 1: Default argument example
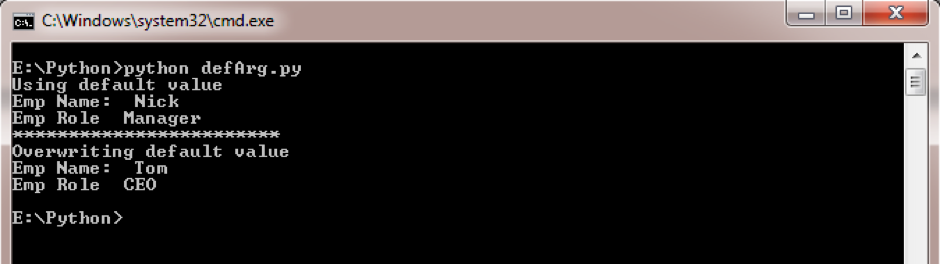
def defArgFunc( empname, emprole = "Manager" ):
   print ("Emp Name: ", empname)
   print ("Emp Role ", emprole)
   return;
print("Using default value")
defArgFunc(empname="Nick")
print("************************")
print("Overwriting default value")
defArgFunc(empname="Tom",emprole = "CEO")
Now run the script file as shown below. It will display the following output:
Required arguments example
The code snippet below represents a required argument example. We have written the code in a script file named
reqArg.py
Listing 2: Required argument example
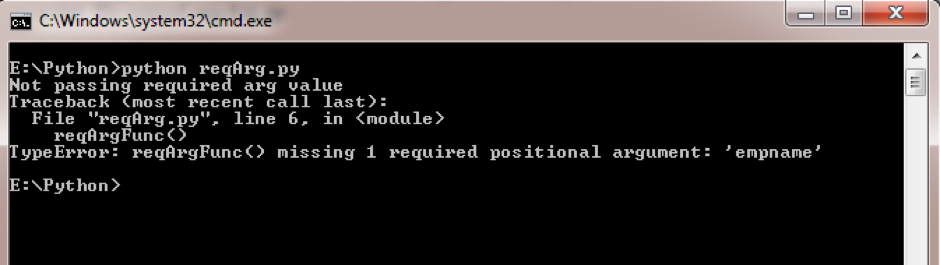
def reqArgFunc( empname):
   print ("Emp Name: ", empname)
   return;
print("Not passing required arg value")
reqArgFunc()
print("Now passing required arg value")
reqArgFunc("Hello")
Now, first run the code without passing the required argument and the following output will be displayed:
Now comment out
reqArgFunc() function call in the script, and run the code with the required argument. The following output will be displayed: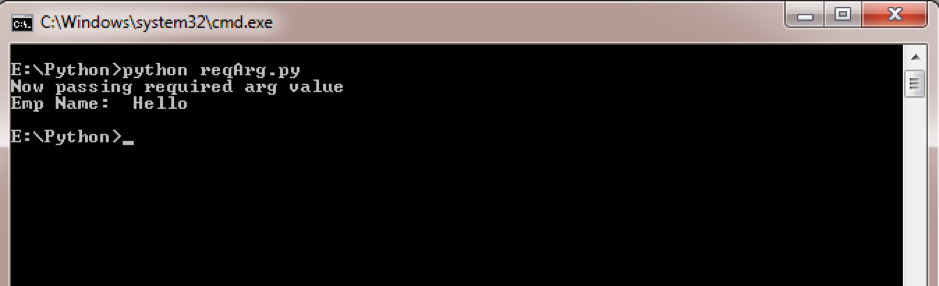
Keyword arguments example
Below is an example of keyword argumentcode snippet. We have written the code in a script file named
keyArg.py
Listing 3: Keyword argument example
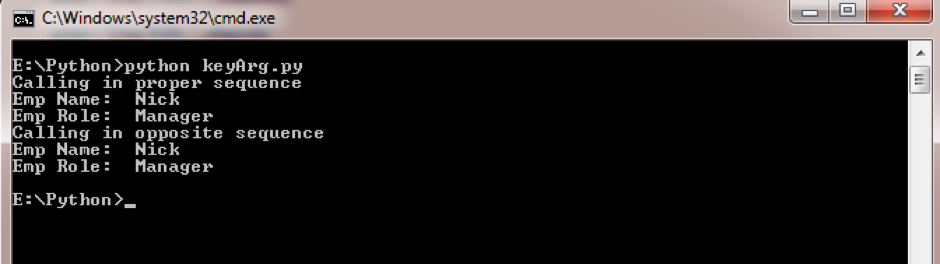
def keyArgFunc(empname, emprole):
   print ("Emp Name: ", empname)
   print ("Emp Role: ", emprole)
   return;
print("Calling in proper sequence")
keyArgFunc(empname = "Nick",emprole = "Manager" )
print("Calling in opposite sequence")
keyArgFunc(emprole = "Manager",empname = "Nick")
Now run the script file as shown below. It will display the following output:
Variable number of arguments example
The code snippet below shows an example of a variable length argument. We have written the code in a script file named
varArg.py
Listing 4: Variable length argument example
def varLenArgFunc(*varvallist ):
   print ("The Output is: ")
   for varval in varvallist:
      print (varval)
   return;
print("Calling with single value")
varLenArgFunc(55)
print("Calling with multiple values")
varLenArgFunc(50,60,70,80)
Once you run the code, the following output will be displayed:

Conclusion
In this article, we have discussed the different aspects of user-defined functions in Python. We have also explored how user-defined functions can be written in simple steps.


