One of the most important security control is limiting administrator permissions as not all users require them to perform their daily tasks. Additionally, with spear-phishing campaigns or exploit-landing sites, it’s easy to take advantage of privileged user accounts that make it easier for malware to write to any folder location, or write to registry paths (file-less malware).Before we dive into the rest of the article let’s go over removing Local Administrator rights for Domain systems (Since this is probably what you were looking for to begin with).
Removing Local Administrators through GPO
A good and effective way to remove your users from being local administrators is to create and apply a group policy object to your computer OUs.
Launch Group Policy:
- Right click your computer OU and
- Create GPO in this domain, and link it here
- Provide a name (RemoveLocalAdmins) , click OK
- Right click your newly created GPO RemoveLocalAdmins and select Edit
- Navigate to Computer Configuration > Preferences > Control Panel Settings > Local Users and Groups
- Right-click anywhere and All Tasks > AddAction: UpdateGroup Name: Administrators (built-in)
Delete All member users (Checked)
Delete all member groups (Checked)Click OK 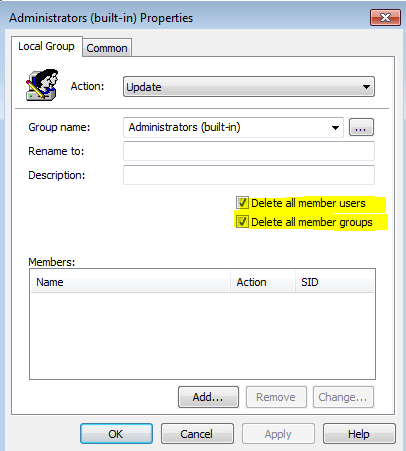
This will ensure that all Local users and groups are removed from the Administrators group. Next, you may re-add the built-in Administrator account and specify a domain group (or not) to be part of the local administrator group.
- Right click your newly created GPO RemoveLocalAdmins and select Edit
- Navigate to Computer Configuration > Preferences > Control Panel Settings > Local Users and Groups
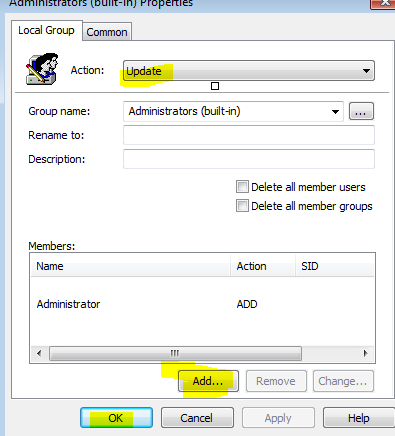
- Right-click anywhere and All Tasks > AddAction: UpdateGroup Name: Administrators (built-in)Click on Add…
Members: Administrator
(Note: when you click Add, you can type Administrator without having to browse for it, it works)
Click OK
You should see something similar to the screenshot below. You may add a description to help your fellow sysadmins.
Exit the Group Policy Manager editor. Now you have finally taken your user rights away.Cheers!
Why do we need local administrator rights?
I won’t go into detail but rather make a few points of why your organization still has everyone as a local administrator.
- “Users have always had it, and it would disrupt their workflow if you took it away” – X Manager
- Legacy software that needs to have local administrator rights (and possibly AV exclusions as well) – Oil & Gas, Accounting/Finance software
- C-level and other executive folks…because they can.
- Your IT department is too lazy to package applications and deploy them through (insert Application deployment Name here e.g (BigFix, KACE, SCCM), and would rather let users install it themselves.
- Because everyone still has that old mentality and think that they need it to add printers.
- [Insert additional excuses here]
A solution to this bad practice:
Here’s my approach when dealing with these type of scenarios and once and for all removing administrative rights away.
- Understand your environment and know exactly what applications are running and when.
- Get upper-management support. Ensure that you explain the risks of having Local Administrator rights. (Show them proof). I will discuss this in more detail.
- Select a good population of representative users to test with (i.e Admins, Business Analysts, Developers, Accountants). Limit their rights and have them provide you feedback on any issues they might run.
- Based on the feedback you collect, create Group Policy-based exclusions and apply them for those computer Organizational Units (OUs), and ensure they work properly on 32-bit & 64-bit.
- Set a deployment schedule and follow it! I would do this based on departments (Week 1: Accounting, Week 3: HR, Week 5: Finance:) or Monthly for those one-offs you might have missed.
- Get your IT staff to follow a checklist in which newly re-imaged systems are moved to the appropriate OUs, or automate it.
- Follow up with upper management about new applications, user feedback and show post-change metrics.
Point 1: Understand your environment
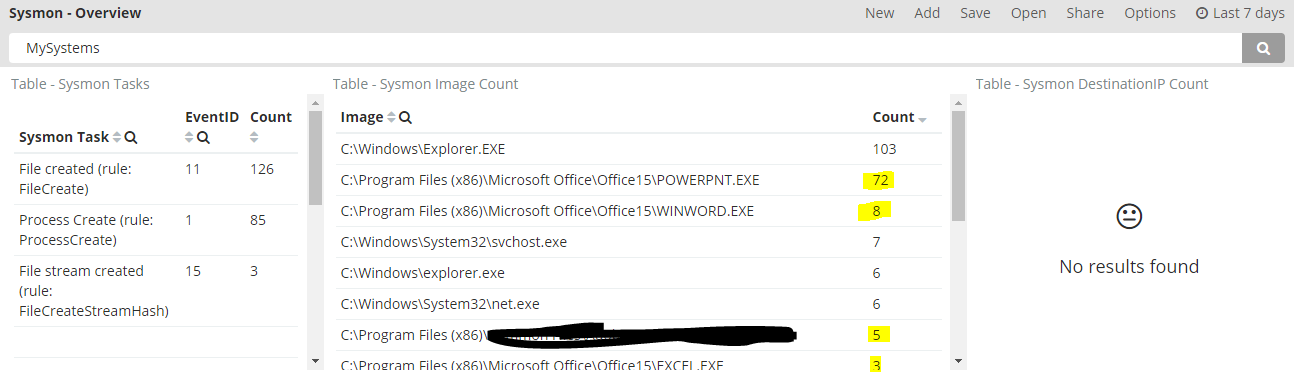
If you have no visibility of what you are trying to protect then you cannot protect it! One of the basic concepts of the Critical Security Controls is to have a way to inventory your assets, which includes software. Understand what software is running in your environment and who is running them. Using our asset management software I am able to query software that is installed based on specific systems. Additionally, I am collecting Windows Event Logs (Sysmon) real-time which allows me to see exactly what software is being launched and when.
This will provide me with applications that might be non-standard and allow me to investigate the requirements for those applications. Additionally, this will also shed some light on applications that are not frequently used (Think of Accounting software that gets used only at the end of the month during closing time), as someone will eventually call you because you didn’t consider everything.
Once you know what’s running and what’s considered “normal” about your environment, you will also start noticing the “abnormal”.
Point 2: Get Upper-Management support
As I mentioned just now, you will also notice the “abnormal” which includes Adware, Games, and other 3rd party software (toolbars!) that users have installed over the years with their privileged accounts. Gather this information and use it as proof to justify the removal of administrator rights when talking to management. Ensure that you explain the risks of having local administrator rights for users and how this is a bad practice in most organizations. I would cover things such as Spear-phishing campaigns (because those target anyone) and the ease in which malware could run, specially with someone having administrative rights. I would also provide a report with software used by each department to prevent those counter-arguments of “not knowing what we need administrator rights for, but we definitely need it”. At the end of the day, the last thing you want to do is prevent people from performing their work; therefore, ensure that you approach them in such a way that you make them think about the company first and understand the risks that “we” all face as a company. Remember that we’re all a team, and as a Security professional you must be able to work well with other departments and provide accurate information.
Point 3: Select a “representative population” or Power Users
After getting the green light from upper-management, you’ll be too excited about limiting user rights; however,this is the time to think about how you will approach this situation. Talk to the Desktop support team and the Managers of each department to carefully select the “Power users”, those that are savvy and will provide you with the feedback needed after their rights have been removed. Give yourself a few weeks to ensure that you have translated those needs into Group Policy exclusions for software which should be limited to Folder Rights and Registry rights.
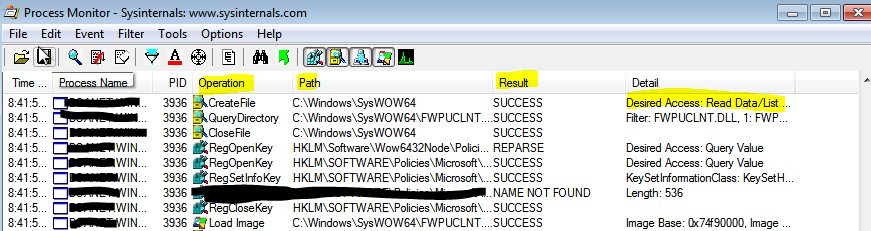
I can’t give enough credit to the Sysinternal tools, and one of the most useful tools to figure out why an application doesn’t run with limited user access is
ProcessMonitor. Run this application (
run as Administrator, I know Ironic!) while you run an application that doesn’t work with limited user rights. It will give you the following information
- Process Name – The application or dependent process running
- Operation – What action is that application/process attempting (Creating a file, Reading registry/writing to registry)
- Path – Self-explanatory
- Result- You will see results such as ACCESS DENIED which will be good indicators of where your exclusions need to be made.
- Detail- In conjunction to the Operation you will know what type of access the application might need (Write/read/modify).
This tool will enable you to create your GPO with those application-specific exclusions.
Point 4: Create Group Policy Objects
At this point you have gathered enough information and know exactly what Folder permissions need to be granted in addition to any registry paths.
Launch Group Policy:
- Right click your computer OU and
- Create GPO in this domain, and link it here
- Provide a name (Non-Admin) , click OK
- Right click your newly created GPO Non-Admin and select Edit
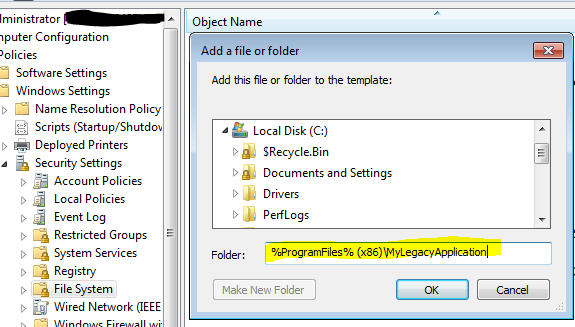
- Navigate to Computer Configuration > Windows Settings > Security Settings > File System
- Right click anywhere and Add File
- Browse or type the desired path then click OK . (Note: Ensure that you consider both 32-bit & 64-bit OS paths)
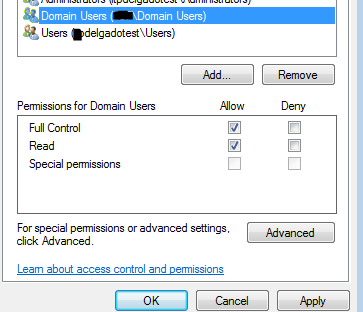
- Select your appropriate group (in this example: Domain Users, or Accounting Users/Finance/Users, or Individual user), and click OK.
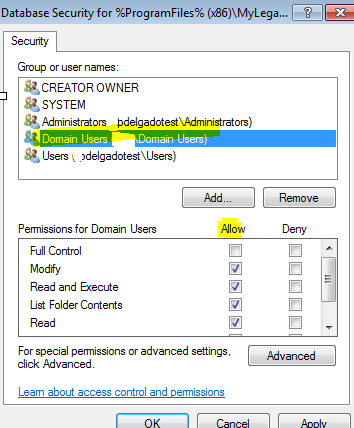
- Depending on how granular you want to get with the folder permissions, choose the appropriate one.
In this case we’re selecting: “Replace existing permissions on all sub-folders and files with inheritable permissions). Click OK
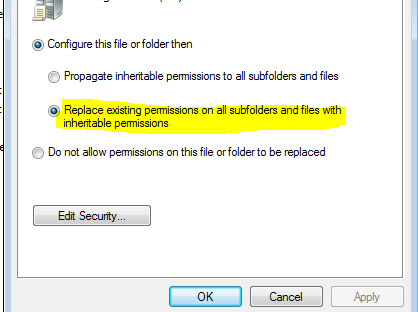
Even if you give the domain users full rights to write/execute to and from a specific folder, you can take it a step further and white-list specific applications expected to run from that directory using
Applocker (if running Windows Enterprise version), so you may sleep better at night.
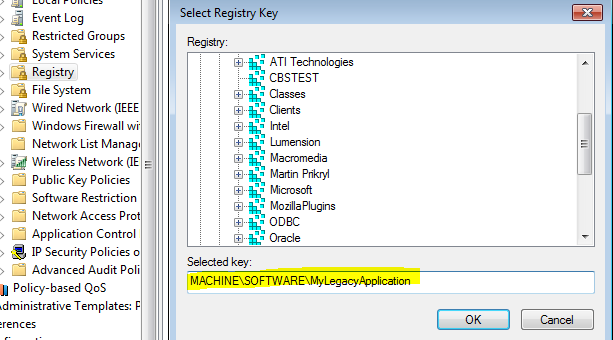
Registry Settings
1. On the left pane you will see an option for Registry. Click on it.
2. Right click anywhere and Add Key. Browse or manually enter the path for the registry.
3. Add the appropriate permissions for the registry and click OK.
4. Again, choose the appropriate way to propagate these permissions. In this case “Replace existing permissions on all subkeys with inheritable permissions) then click
OK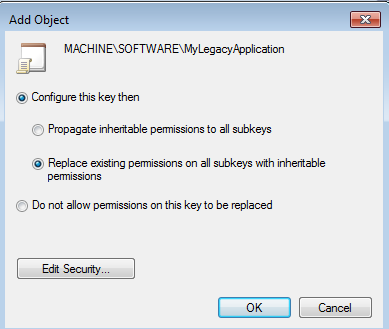
5. Done! you may exit the Group Policy Management Editor.
On your Power User system, you may run a gpupdate /force command to force a GPO update and apply the settings.
Re-launch the legacy application and see if it works, otherwise re-run ProcessMonitor.
Point 5: Create a deployment schedule and stick to it
After a few weeks/months of testing with your power users, you should now be confident on the findings and exclusions you have set in place in your Group policy. Now create a schedule and start moving department systems to the “No-Admin GPO”.
My suggestions:
- Provide enough time to remediate issues that might come up. (Wait a few weeks before you start with moving another department)
- Review Application logs for potential “Access denied” logs when updates are ran
- Ensure that GPO is being applied to all of your endpoints
Point 6: Create a checklist or automate the process for re-imaged systems
Six months from now you will realize that there’s still a high amount of local administrators even though you took the initiative to move most endpoints to the appropriate OUs. Most of these systems are newly re-imaged systems that your Desktop support team or Sysadmins built and joined to the Domain without moving them to the appropriate OUs. You need a way for them to follow a checklist and ensure that no domain user is added as the local administrator, and that the system will be moved to a restricted OU before it is provided to the user.
If you’re like me, you’d like to automate this process, here’s a few options:
- If you sysprep your systems, you should be able to add the OU information to the configuration file
- SCCM or KACE will also allow you to move to a specific OU post re-image phase
- Write a powershell script that will move newly-joined Domain systems to the appropriate OUs
Ensure that you have a discussion with other IT groups so that everyone is on the same page; otherwise, your help desk will continue to add domain users as administrators and your efforts will fail.
Update 09-26-2017 (powershell script)
Here’s a powershell script that you may use to move your Workstations/servers to a specific OU in which you have implemented the Non-Admin GPO discussed earlier. This will ensure that all of your newly domain-joined systems do not have administrator rights. This script may be added as a scheduled task and set to run at whatever interval you want (I run mine daily)
#This script grabs the OperatingSystem information from the default Computers container and if they match a-
#-Certain Server Operating system, they will be  moved to the Domain Computers\Servers only.
$a = Get-ADComputer -filter * -SearchBase "CN=Computers,DC=domain,DC=com" -Property OperatingSystem
Foreach ($os in $a)
{
if ($os.OperatingSystem -match "Windows 7*")
{ $os | Move-ADObject -TargetPath "OU=Non-Admin-Workstations,DC=domain,DC=com"
}
#Added a Powershell comment block, if you need to move a specific version of Windows, just Uncomment it.
<# Elseif($os.OperatingSystem -match "Windows Server 2003")
{ $os | Move-ADObject -TargetPath "OU=Servers,OU=Domain Computers,DC=domain,DC=com"
}
Elseif($os.OperatingSystem -match "Windows Server 2008 *")
{ $os | Move-ADObject -TargetPath "OU=Servers,OU=Domain Computers,DC=domain,DC=com"
}
Elseif($os.OperatingSystem -match "Windows Server 2012*")
{ $os | Move-ADObject -TargetPath "OU=Servers,OU=Domain Computers,DC=domain,DC=com"
}
Elseif($os.OperatingSystem -match "Windows Server 2016*")
{ $os | Move-ADObject -TargetPath "OU=Servers,OU=Domain Computers,DC=domain,DC=com"
}
Elseif($os.OperatingSystem -match "Windows Storage Server*")
{ $os | Move-ADObject -TargetPath "OU=Servers,DC=domain,DC=com"
}
Elseif($os.OperatingSystem -match "Windows Embedded Standard*")
{ $os | Move-ADObject -TargetPath "OU=Servers,DC=domain,DC=com"
}
Elseif($os.OperatingSystem -match "Windows NT*")
{ $os | Move-ADObject -TargetPath "OU=Servers,DC=domain,DC=com"
}
#>

}
Point 7: Revisit with Upper-Management
After user complains have significantly decreased to a few calls every other week, you should now pat yourself in the back and look at the progress that you have made. Re-run your reports looking for 3rd party software, toolbars, malware objects and see if your environment is doing better than it was when you initially started. Report this to upper management and thank them for their cooperation as it is difficult to get people on-board most of the time.
You did great! but remember…
Business operations will continue to evolve, and new software vendors will come into the picture. You want to ensure that your IT staff has ways to deploy new software (Using Application deployment tools such as Big Fix, KACE, SCCM, etc); otherwise, that whole department will need to have local administrator rights to install the software.