Showing posts with label Windows Server. Show all posts

Group Expiration on Active Directory (2016)

Active Directory is the base technology used to provide authentication and authorization services to Microsoft and third-party applications. Microsoft has been focusing more on the development of Active Directory and has been introducing new features in every new version of Windows Server. We saw enhancements in Active Directory running on Windows Server 2012 such as applying virtual snapshots to a domain controller, domain controller cloning feature, Active Directory recycle bin, fine-grained password policies (referred to as just FGPP), dynamic access control, and many other features. Windows Server 2016 brings some new and exciting features for Active Directory. The main feature that was introduced in Windows Server 2016 is the Group membership expiration, which is the focus of this article.

Group membership expiration

One of the notable features added to Windows Server 2016 Active Directory is “group membership expiration.” In earlier versions of Active Directory, if you added users to a security group temporarily, you had to keep track of users to be removed from the security group to avoid any potential harm and to ensure users are removed from the security groups for compliance purposes. For example, if you add someone to the domain admins security group to perform some admin tasks in Active Directory for a certain period of time and if you forgot to remove the user from the group, the user may have unauthorized access to the Active Directory and other systems in the production environment. If you needed to perform removal of several users from the security group, you had to design a script that would process the users stored in a CSV file and then remove the users from the security group. But group membership expiration can help you remove users from the security group automatically. It allows you to add a user to a security group for a certain period of time. This feature is quite handy if you need someone to be part of a security group for a limited time, for example installing an application and to perform some maintenance tasks on the systems.

Requirements for using group membership expiration

There are a few requirements that you need to meet before group membership expiration feature can be used as listed below:

First, make sure to raise the functional level to Windows Server 2016. It may be difficult for many organizations to raise functional levels to Windows Server 2016 due to the fact most of the production environments are still running Windows Server 2012 R2 and earlier versions of domain controllers. Note that raising the function level to Windows Server 2016 will disable the ability to install earlier versions of domain controllers. You can verify the current functional level by executing the PowerShell command below:


Get-Domain | Select DomainMode
Get-ADForest | Select ForestMode


The group membership expiration feature was introduced as part of the PAM (privileged access management) feature. To ensure PAM is enabled, run this PowerShell command:


Get-ADOptionalFeature “Privileged Access Management Feature”


Once privileged access management is enabled, you can use simple PowerShell commands to add an expiration date for a user account as shown below:


$TTL = New-TimeSpan –Minutes 30
Add-ADGroupMember -Identity “Domain Admins” -Members TestUser -MemberTimeToLive $TTL


As you can see in the above commands, the first command creates a time entry, the second command uses Add-ADGroupMember PowerShell cmdlet to add “TestUser” to domain admins security group, and then also specify the time when the user needs to be removed from the security group. The second command uses “-MemberTimeToLive” property to set the expiration time for the user. When the time expires, the user “TestUser” is automatically removed from the domain admins security group.

The group membership expiration feature is quite useful when dealing with contractors, vendors, temporary employees, and anyone else who needs temporary access to Active Directory and systems connected to the production environment. The group membership expiration feature will surely avoid any security risks in the production environment.

Time synchronization enhancements

Time synchronization throughout the Active Directory forest is necessary considering the fact Kerberos authentication protocol requires systems in sync before an identity can be authenticated. Windows Server 2016 adds new enhancements to the time synchronization algorithm such as making sure frequent time adjustments are processed, eliminating any rounding errors that generally occur when synchronizing time with a PDC or a domain controller. Accuracy has been improved from 100s of milliseconds to the 10s of microseconds.

Enforced Password Change at next logon attempt - Windows

If your AD account has the “User must change password at next logon” option enabled:
clip_image001
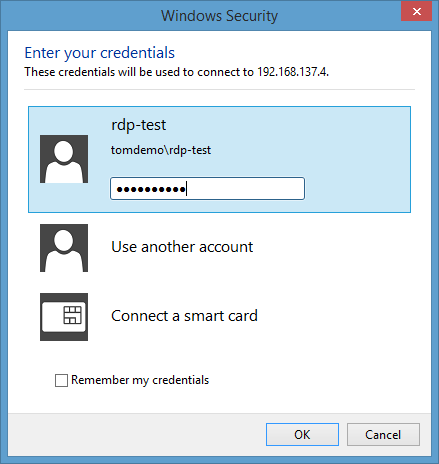
and you try to logon to a RDP session (with correct credentials):
image
you might encounter this error message:
image
“You must change your password before logging on the first time. Please update your password or contact your system administrator or technical support.”
This is a classic catch 22 issue: You have to logon to change you password, but you cannot logon until you’ve changed you password.
If you have access to a “normal” network connected Windows client you can change the password that way, but what if you only have RDP access?

Client side

Well, if the server allows it, you can temporary disable “Credential Security Support Provider (CredSSP)” in the RPD client. This disables Network Layer Authentication, the pre-RPD-connection authentication, and therefore enables you to change your password via RDP. CredSSP is enabled by default in the RDP client on Windows Vista and forward.
There is no option to disable CredSSP in the RDP client, so here is how you have to do it:
  • Start mstsc.exe
  • Click Show Options
  • Click Save As
image
  • Call it ChangePassword.rpd (or anything you’d like, but avoid the name Default.rdp)
  • Open the saved ChangePassword.rpd in Notepad
  • Add a new row at the end with the following text:
    enablecredsspsupport:i:0
clip_image003
  • Save the rdp file
  • Double-click the rdp file
  • Enter the name/IP of a domain connected computer with RDP enabled
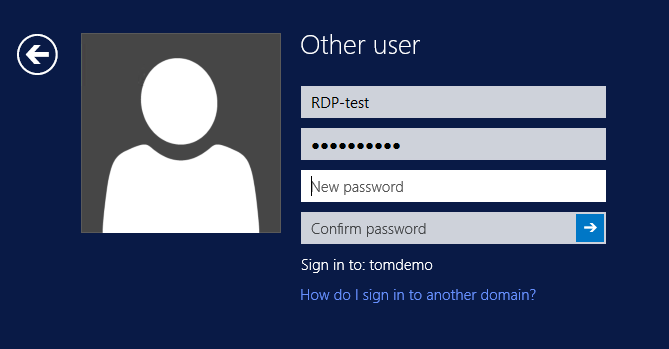
Instead of the local Windows Security prompt (the second image in the blog post) you should see a Windows Logon screen on the remote computer (if not, read on anyway):
image
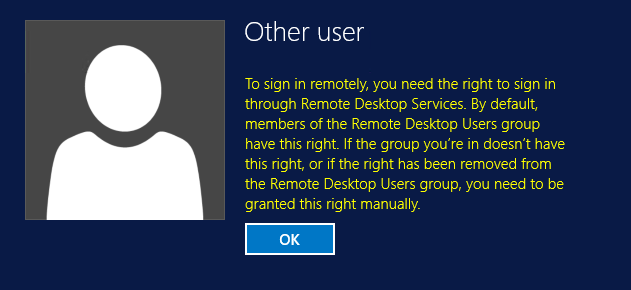
If the account you log on with at this point has the “User must change password at next logon” option enabled, you get notified about that:
image
By clicking OK you get the possibility to change the password (yay!):
image
After changing the password you get confirmation about the change:
image´
Clicking OK logs you in.
In fact, you do not need to have access to sign in through RDP, in that case this shows up, but only after you successfully changed your password:
image
Delete the ChangePassword.rdp file when you are done (or at least do not use it until you are forced to change your password again), since disabling CredSSP lowers the security of RDP connections.

If the server requires CredSSP

If the server does not allow you to disable Credential Security Support Provider, you get this error message when connecting:
image
In that case, try connecting using the FQDN (DC01.tomdemo.se and not only DC01) or connect to other servers that might allow you to disable CredSSP. As I mentioned above, you don’t have to have access to actually logon to the server.

Server side

You can also disable CredSSP on the server side, but since that lowers the security on all RDP connections to that server it is not recommended.
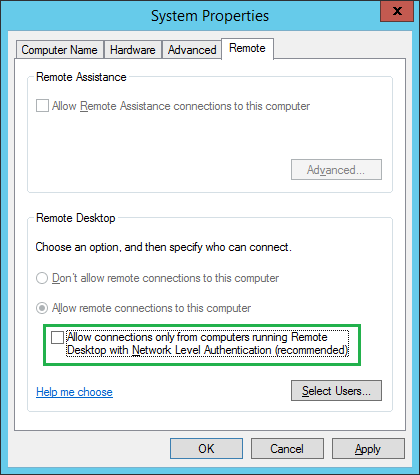
If you chose to do this anyway, you do it either by de-selecting “Allow connections only from computers running Remote Desktop with Network Level Authentication (recommended)” in System Properties:
image
Or if you run the Terminal Server Role:
  • Open Terminal Server Configuration
  • Open RDP-Tcp configuration page
  • On the General tab, set the Security Layer to RDP Security Layer
image
Note that if you already have an existing access to a server (with the account you need to change the password with) you could just change your password in that session by pressing Ctrl-Alt-Del (or Ctrl-Alt-End in an RDP connection) and choosing Change a password:
image
I hope this post helped.

Windows 2003/2008 Server - Shutdown options

When the Windows Server 2003 computer you are working on will not shut down and you don't have any luck using the Start menu or the [Ctrl][Alt][Delete] methods — and you need to restart the server as quickly as possible — Derek Schauland can help you. Here is a quick workaround that gets the job done — and you don't even have to handle power cords or the power switch.
The Windows Server 2003 computer you are working on will not shut down. You don't have any luck using the Start menu or the [Ctrl][Alt][Delete] methods, and you need to restart the server as quickly as possible. There is a quick workaround that gets the job done — and you don't even have to handle power cords or the power switch.
From the command line, you can shut down or reboot any Windows Server 2003 computer (or even Windows XP or Vista machines) with the Shutdown.exe command. (Note: The exe file extension is optional for the Shutdown command.) Shutdown.exe contains a number of switches that allow you to specify different actions for the server when the Shutdown command executes. The Shutdown.exe switches are as follows:
/?Displays the Help listing
/iDisplays the graphical user interface (GUI); it must be the first option
/lLogs off the current user; it cannot be used with the /d or /m options
/sShuts down the computer
/rShuts down and restarts the computer
/gShuts down and restarts the computer and then restarts any registered applications
/aAborts system Shutdown
/pTurns off the local computer with no timeout or warning
/hHibernates the local machine
/eDocuments the reason for shutting down the computer
/mSpecifies the target computer; it is used with \\computername
/t xxxWhere xxx is the number of seconds before Shutdown
/c "comment"Where "comment" is the reason for the Shutdown or restart
/fForces running applications to close without warning users
/d [p|u:]xx:yyProvides the reason for the Shutdown action: p = planned; u= unplanned; xx supplies the major reason code; yy = supplies the minor reason code
When you enter a Shutdown with no arguments, the Help listing will display. The Help listing also includes the reason codes available for use with the /d switch. The reason codes are shown below:
Reasons on this computer:
E=ExpectedU=UnexpectedP=Plannedc=Customer Defined
TypeMajorMinorTitle


U
0
0
Other(Unplanned)
E
0
0
Other(Unplanned)
EP
0
0
Other(Planned)
U
0
5
Other Failure: System Unresponsive
E
1
1
Hardware: Maintenance(Unplanned)
EP
1
1
Hardware: Maintenance(Planned)
E
1
2
Hardware: Installation(Unplanned)
EP
1
2
Hardware: Installation(Planned)
P
2
3
Operating System: Upgrade (Planned)
E
2
4
Operating System:
Reconfiguration (Unplanned)
EP
2
4
Operating System:
Reconfiguration(Planned)
P
2
16
Operating System:
Service Pack (Planned)
U
2
17
Operating System:
Hotfix (Unplanned)
P
2
17
Operating System:
Hotfix(Planned)
U
2
18
Operating System:
Security Fix(Unplanned)
P
2
18
Operating System:
Security Fix(Planned)
E
4
1
Application: Maintenance(Unplanned)
EP
4
1
Application: Maintenance(Planned)
EP
4
2
Application: Installation(Planned)
E
4
5
Application: Unresponsive
E
4
6
Application: Unstable
U
5
15
System Failure: Stop Error
E
5
19
Security Issue
U
5
19
Security Issue
EP
5
19
Security Issue
E
5
20
Loss of Network Connectivity
(Unplanned)
U
6
11
Power Failure: Cord Unplugged
U
6
12
Power Failure: Environment
P
7
0
Legacy API Shutdown
You can use many of these switches in conjunction with one another when issuing the Shutdown command. A usage example for the Shutdown command follows:
Shutdown /r /c "Hanging Application or service" /t 30
This example would restart the local machine storing the comment provided with the /c switch. Windows would wait 30 seconds before initiating the restart. You might also create a batch file to use when it is necessary to restart a server in a remote location. The batch file might look like this:
Shutdown /m \\computername /r /c "Remote Restart" /t 45
By saving this command in a batch file, it can save you time if you routinely restart the same remote server.