Below steps have been tried on 2 different Windows 10 laptops, with two different Spark versions (2.x.x) and with Spark 3.1.2.

Installing Prerequisites
PySpark requires Java version 7 or later and Python version 2.6 or later.
- Java
To check if Java is already available and find it’s version, open a Command Prompt and type the following command.
java -versionIf the above command gives an output like below, then you already have Java and hence can skip the below steps.
java version "1.8.0_271"
Java(TM) SE Runtime Environment (build 1.8.0_271-b09)
Java HotSpot(TM) 64-Bit Server VM (build 25.271-b09, mixed mode)
Java comes in two packages: JRE and JDK. Which one to use between the two depends on whether you want to just use Java or you want to develop applications for Java.
You can download either of them from the Oracle website.
Do you want to run Java™ programs, or do you want to develop Java programs? If you want to run Java programs, but not develop them, download the Java Runtime Environment, or JRE™
If you want to develop applications for Java, download the Java Development Kit, or JDK™. The JDK includes the JRE, so you do not have to download both separately.
For our case, we just want to use Java and hence we will be downloading the JRE file.
1. Download Windows x86 (e.g. jre-8u271-windows-i586.exe) or Windows x64 (jre-8u271-windows-x64.exe) version depending on whether your Windows is 32-bit or 64-bit
2. The website may ask for registration in which case you can register using your email id
3. Run the installer post download.
Note: The above two .exe files require admin rights for installation.
In case you do not have admin access to your machine, download the .tar.gz version (e.g. jre-8u271-windows-x64.tar.gz). Then, un-gzip and un-tar the downloaded file and you have a Java JRE or JDK installation.
You can use 7zip to extract the files. Extracting the .tar.gz file will give a .tar file- extract this one more time using 7zip.
Or you can run the below command in cmd on the downloaded file to extract it:
tar -xvzf jre-8u271-windows-x64.tar.gzMake a note of where Java is getting installed as we will need the path later.
2. Python
Use Anaconda to install- https://www.anaconda.com/products/individual
Use below command to check the version of Python.
python --versionRun the above command in Anaconda Prompt in case you have used Anaconda to install it. It should give an output like below.
Python 3.7.9Note: Spark 2.x.x don’t support Python 3.8. Please install python 3.7.x. For more information, refer to this stackoverflow question. Spark 3.x.x support Python 3.8.
Scripted setup
Following steps can be scripted as a batch file and run in one go. Script has been provided after the below walkthrough.
Getting the Spark files
Download the required spark version file from the Apache Spark Downloads website. Get the ‘spark-x.x.x-bin-hadoop2.7.tgz’ file, e.g. spark-2.4.3-bin-hadoop2.7.tgz.
Spark 3.x.x also come with Hadoop 3.2 but this Hadoop version causes errors when writing Parquet files so it is recommended to use Hadoop 2.7.
Make corresponding changes to remaining steps for the chosen spark version.
You can extract the files using 7zip. Extracting the .tgz file will give a .tar file- extract this one more time using 7zip. Or you can run the below command in cmd on the downloaded file to extract it:
tar -xvzf spark-2.4.3-bin-hadoop2.7.tgzPutting everything together
Setup folder
Create a folder for spark installation at the location of your choice. e.g. C:\spark_setup.
Extract the spark file and paste the folder into chosen folder: C:\spark_setup\spark-2.4.3-bin-hadoop2.7
Adding winutils.exe
From this GitHub repository, download the winutils.exe file corresponding to the Spark and Hadoop version.
We are using Hadoop 2.7, hence download winutils.exe from hadoop-2.7.1/bin/.
Copy and replace this file in following paths (create \hadoop\bin directories)
C:\spark_setup\spark-2.4.3-bin-hadoop2.7\binC:\spark_setup\spark-2.4.3-bin-hadoop2.7\hadoop\bin
Setting environment variables
We have to setup below environment variables to let spark know where the required files are.
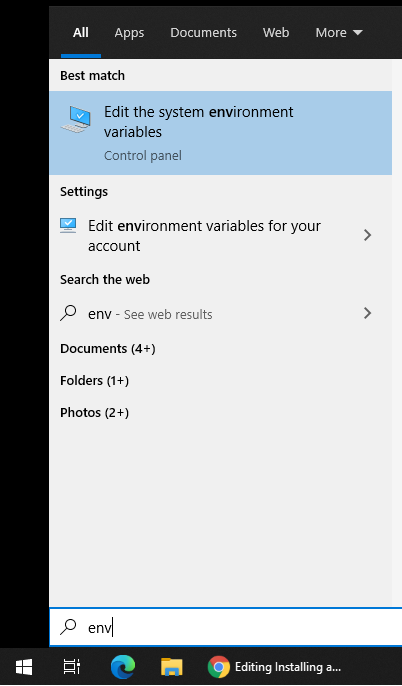
In Start Menu type ‘Environment Variables’ and select ‘Edit the system environment variables’
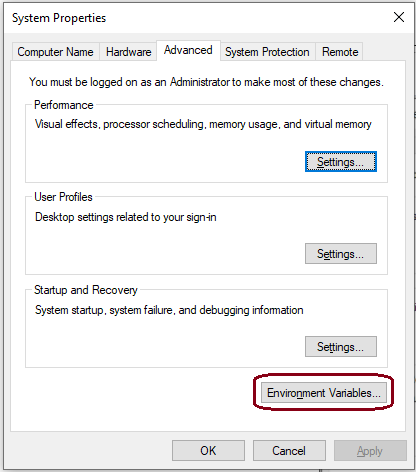
Click on ‘Environment Variables…’
Add ‘New…’ variables
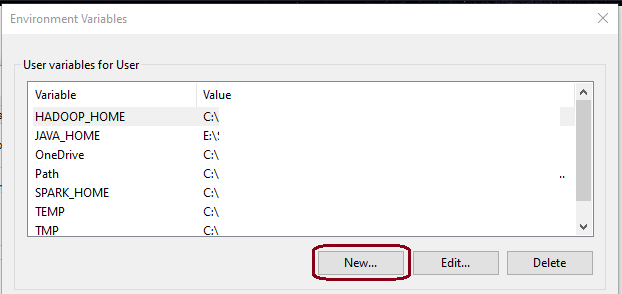

- Variable name:
SPARK_HOME
Variable value:C:\spark_setup\spark-2.4.3-bin-hadoop2.7(path to setup folder) - Variable name:
HADOOP_HOME
Variable value:C:\spark_setup\spark-2.4.3-bin-hadoop2.7\hadoop
OR
Variable value:%SPARK_HOME%\hadoop - Variable name:
JAVA_HOME
Variable value: Set it to the Java installation folder, e.g.C:\Program Files\Java\jre1.8.0_271
Find it in ‘Program Files’ or ‘Program Files (x86)’ based on which version was installed above. In case you used the.tar.gzversion, set the path to the location where you extracted it. - Variable name:
PYSPARK_PYTHON
Variable value:python
This environment variable is required to ensure tasks that involve python workers, such as UDFs, work properly. Refer to this StackOverflow post. - Select ‘Path’ variable and click on ‘Edit…’
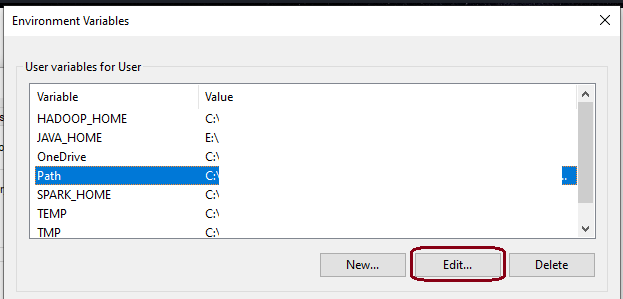
Click on ‘New’ and add the spark bin path, e.g. C:\spark_setup\spark-2.4.3-bin-hadoop2.7\bin OR %SPARK_HOME%\bin
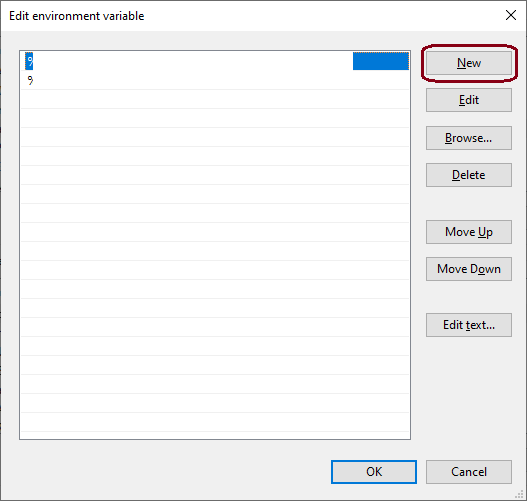
All required Environment variables have been set.
Optional variables: Set below variables if you want to use PySpark with Jupyter notebook. If this is not set, PySpark session will start on the console.
- Variable name:
PYSPARK_DRIVER_PYTHON
Variable value:jupyter - Variable name:
PYSPARK_DRIVER_PYTHON_OPTS
Variable value:notebook
Scripted setup
Edit and use below script to (almost) automate PySpark setup process.
Steps that aren’t automated: Java & Python installation, and Updating the ‘Path’ variable.
Install Java & Python before, and edit the ‘Path’ variable after running the script, as mentioned in the walkthrough above.
Make changes to the script for the required spark version and the installation paths. Save it as a .bat file and double-click to run.
Using PySpark in standalone mode on Windows
You might have to restart your machine post above steps in case below commands don’t work.
Commands
Each command to be run in a separate Anaconda Prompt
- Deploying Master
spark-class.cmd org.apache.spark.deploy.master.Master -h 127.0.0.1 - Deploying Worker
spark-class.cmd org.apache.spark.deploy.worker.Worker spark://127.0.0.1:7077SparkUI will show the worker status.
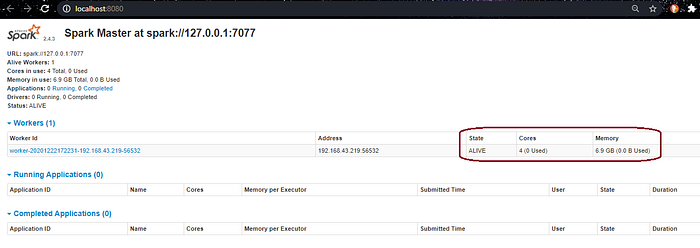
3. PySpark shellpyspark --master spark://127.0.0.1:7077 --num-executors 1 --executor-cores 1 --executor-memory 4g --driver-memory 2g --conf spark.dynamicAllocation.enabled=false
Adjust num-executors, executor-cores, executor-memory and driver-memory as per machine config. SparkUI will show the list of PySparkShell sessions.
Activate the required python environment in the third anaconda prompt before running the above pyspark command.
The above command will open Jupyter Notebook instead of pyspark shell if you have set the PYSPARK_DRIVER_PYTHON and PYSPARK_DRIVER_PYTHON_OPTS Environment variables as well.
Alternative
Run below command to start pyspark (shell or jupyter) session using all resources available on your machine. Activate the required python environment before running the pyspark command.
pyspark --master local[*]
Please let me know in comments if any of the steps give errors or you face any kind of issues.