Showing posts with label Installation. Show all posts

Installing Spark on Windows 10


Prerequisites

  • Install and configure hadoop


1.Download Apache Spark
  • https://spark.apache.org/downloads.html
  • Under the Download Apache Spark heading, there are two drop-down menus. Use the current non-preview version.
  • In our case, in Choose a Spark release drop-down menu select 2.4.5
  • In the second drop-down Choose a package type, leave the selection Pre-built for Apache Hadoop 2.7
  • Click the spark-2.4.5-bin-hadoop2.7.tgz link

02. Create Folder path ‘C:\Spark’ and Extrcat the downloaded Spark file from ‘Download’ folder to ‘C:\Spark’

03. Set in the ‘Environment Variable’

04. Launch Spark

  • Open a new command-prompt window using the right-click and Run as administr
  • Run below the command ‘spark-shell’ from C:\Spark\bin
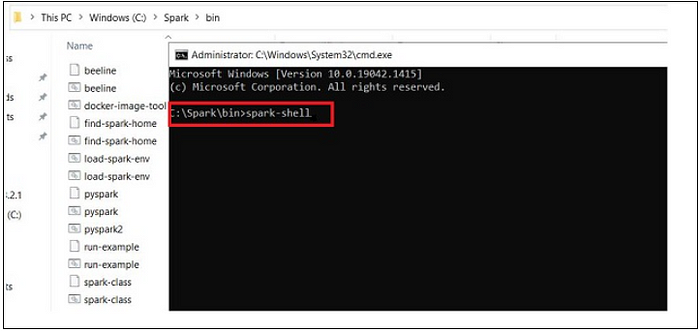
4.1 Finally, the Spark logo appears, and the prompt displays the Scala shell.

4.2 Open a web browser and navigate to http://localhost:4040/

4.3 To exit Spark and close the Scala shell, press ctrl-d in the command-prompt window.

4.4 Start Spark in ‘Pyspark’ as Shell

The PySpark shell is responsible for linking the python API to the spark core and initializing the spark context.

5. Start Master and Slave

  1. Setup and Run Spark Master and Save on the Machine (Standalone)
  • Run Master
  • — — Open the ‘command Prompt’ from the path ‘C:\Spark\bin’
  • — — Run Below the command

C:\Spark\bin>spark-class2.cmd org.apache.spark.deploy.master.Master

C:\Spark\bin>spark-class org.apache.spark.deploy.master.Master

2. Run Slave

  • Open the command Prompt from the path ‘C:\Spark\bin’
  • Run Below the command

C:\Spark\bin>spark-class2.cmd org.apache.spark.deploy.worker.Worker -c 1 -m 4G spark://10.0.0.4:7077

Note : Make Sure Master and Slave Command Prompt are running

6. Web GUI

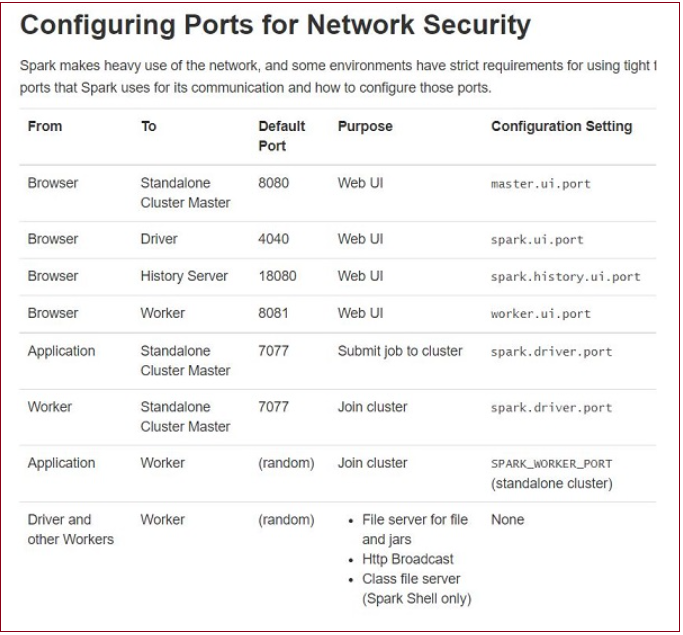
  • Apache Spark provides suite Web UI for monitor the status of your Spark/PySpark application, resource consumption of
    Spark cluster, and Spark configurations.
  • Apache Spark Web UI

— Jobs
— Stages
— Tasks
— Storage
— Environment
— Executors
— SQL

Open a web browser and navigate to http://localhost:4040/

Note : Master and Slave should be started

Create A python program as below and save it as spark_basic.py on the desktop

  • spark_basic.py
    import findspark
findspark.init('C:\Spark')

from pyspark import SparkConf
from pyspark import SparkContext

conf = SparkConf()
conf.setMaster('spark://10.0.0.4:7077') # Mention the Master Node
conf.setAppName('spark-basic')
sc = SparkContext(conf=conf)

def mod(x):
import numpy as np
return (x, np.mod(x, 2))

rdd = sc.parallelize(range(1000)).map(mod).take(10)
print(rdd)

Refresh the master WebGUI

Refresh the Slave WebGUI
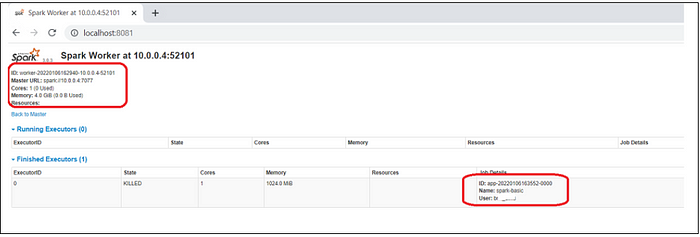
Note: Make Sure While Running Spark Application (Code from python File) Master and Slave are runnning
Installing Drupal 9 on Windows 10

 1. Setup Database on MySQL 

# create database

CREATE DATABASE db_name;

CREATE DATABASE db_name DEFAULT CHARACTER SET utf8 COLLATE utf8_unicode_ci;

SHOW DATABASES;

GRANT ALL ON db_name.* TO 'user_name'@'localhost' IDENTIFIED BY 'userpass_name';

SELECT user FROM mysql. user;

FLUSH PRIVILEGES;

EXIT;

2. Download and Extract Drupal 9

3. Add Entry in IIS 

4. Navigate to URL

ISSUES

Issue:.IIS Handler Mapping Error: 

There was an error while performing this operation" web.config
Filename: \\?\C:\Inetpub\wwwroot\<folder>\web.config


Details:

It turned out the website was using URL rewrite module which i was missing.

Downloaded web platform installer from MS and installed URL rewrite module.

http://www.microsoft.com/web/downloads/platform.aspx

Wish IIS errors were more informative than just "There was an error..."

Resolution:

install URL Rewrite 


Issue: PHP EXTENSIONS Disabled gd windows 10 IIS

Resolution:

In order to enable GD Library support for PHP on Windows server, follow the below mentioned steps:

First of all, make sure that php_gd2.dll file is present into the directory identified as extension directory in PHP folder.

If the above file is not present, then you need to download it from http://php.net/ and copy in the extension directory of PHP folder.

If the file is already present, then you need to enable php_gd2.dll extension from php.ini configuration file.

You can verify extension-dir through PHPINFO page. Following is the code for PHPINFO Page:

<?php

phpinfo();

?>

After performing all these steps, restart the IIS web server.


Issue: Upgrade MySQL from 5.x to 8.x

Resolution:

https://dev.mysql.com/get/Downloads/MySQLInstaller/mysql-installer-community-8.0.19.0.msi

https://www.sqlshack.com/how-to-install-mysql-database-server-8-0-19-on-windows-10/

cd "C:\Program Files\MySQL\MySQL Server 5.5\bin"

#Backup the databases

mysqldump --lock-all-tables -u root -p --all-databases > dump.sql

#Stop the service and Uninstall

SC STOP MySQL

"C:\Program Files\MySQL\MySQL Server 5.5\bin\mysqladmin" -u root shutdown


Issue: OPcache disabled

Resolution:

OPcache can only be compiled as a shared extension. If you have disabled the building of default extensions with --disable-all, you must compile PHP with the --enable-opcache option for OPcache to be available.

Once compiled, you can use the zend_extension configuration directive to load the OPcache extension into PHP. This can be done with zend_extension=/full/path/to/opcache.so on non-Windows platforms, and zend_extension=C:\path\to\php_opcache.dll on Windows.

Note:

If you want to use OPcache with » Xdebug, you must load OPcache before Xdebug.

Recommended php.ini settings 

The following settings are generally recommended as providing good performance:

opcache.memory_consumption=128

opcache.interned_strings_buffer=8

opcache.max_accelerated_files=4000

opcache.revalidate_freq=60

opcache.fast_shutdown=1

opcache.enable_cli=1


How to Install Windows 7 From USB

Chances are you'll need to install Windows 7 from a USB device if you have a tablet, or small laptop or netbook device, few of which include optical drives as standard hardware.
This means that you must get the Windows 7 setup files onto a flash drive (or any USB based storage) and then boot from that flash drive to get the Windows 7 installation process started.
However, simply copying the files from your Windows 7 DVD to a flash drive won't work.
You have to specially prepare the USB device and then properly copy the Windows 7 install files to it before it'll work as you expect.
You're in a similar, but slightly easier to solve, situation if you've purchased a Windows 7 ISO file directly from Microsoft and need that on a flash drive.
No matter what situation you're in, just follow the instructions below to install Windows 7 from a USB device.
Note: The following tutorial applies equally to whatever edition of Windows 7 you have a disc or ISO image of: Windows 7 Ultimate, Professional, Home Premium, etc.
What You'll Need:
  • A Windows 7 ISO or DVD [See Where Can I Download Windows 7? for information on getting an ISO image, or buy a new Windows 7 DVD from NewEgg.]
  • A 4 GB (or larger) flash drive
  • Access to a computer with Windows 7, 8, 10, Vista, or XP installed and working properly, as well as with a DVD drive if you have a Windows 7 DVD

How to Install Windows 7 From USB

Correctly preparing a USB drive for use as an installation source for Windows 7 will take around 15 to 30 minutes depending on your computer speed and what edition of Windows 7 you have on DVD or in ISO format
Important: Start with Step 1 below if you have a Windows 7 DVD or Step 2 if you have a Windows 7 ISO image.
  1. Create an ISO file from the Windows 7 DVD. If you already know how to create ISO images, fantastic: do it, and then come back here for further instructions on what to do with it.

    If you've never created an ISO file from a disc before, check out the tutorial linked above. It'll walk you through installing some free software and then using it to create the ISO. An ISO image is a single file that perfectly represents a disc... in this case, your Windows 7 installation DVD.

    Next we're going to work on properly getting that Windows 7 ISO image you just created onto the flash drive.
  1. Download Microsoft's Windows 7 USB/DVD Download Tool. Once downloaded, execute the file and follow the installation wizard.

    This free program from Microsoft, which works in Windows 10Windows 8, Windows 7, Windows Vista, or Windows XP, will correctly format the USB drive and then copy the contents of your Windows 7 ISO file to the drive.
  2. Start the Windows 7 USB DVD Download Tool program, which is probably located in your Start menu or on your Start screen, as well as on your Desktop.
  3. On the Step 1 of 4: Choose ISO file screen, click Browse.
  4. Locate, and then select, your Windows 7 ISO file. Then click Open.

    Note: If you downloaded Windows 7 directly from Microsoft, check for the ISO image wherever you tend to store downloaded files. If you manually created an ISO file from your Windows 7 DVD in Step 1 above then it will be wherever you saved it to.
  5. Click Open.
  6. Click Next once you're back on the Step 1 of 4 screen.
  7. Click USB device on the Step 2 of 4: Choose media type screen.
  8. On the Step 3 of 4: Insert USB device screen, choose the flash drive or external hard drive you want to put the Windows 7 installation files on.

    Tip: If you haven't yet plugged in the flash drive or other device you're using, you can do that now. Just click the blue refresh button to make it show up in the list.
  1. Click the Begin copying button.
  2. Click Erase USB Device if you're prompted to do so on a Not Enough Free Space window. Then click Yes to the confirmation in the next window.

    Note: If you don't see this it just means that the flash drive or external hard disk you've selected is already empty.

    Important: Any data you have on this USB drive will be erased as part of this process.
  3. On Step 4 of 4: Creating bootable USB device, wait for the Windows 7 USB DVD Download Tool to format the USB drive and then copy the Windows 7 installation files to it from the ISO image you provided.

    You'll see a Status of Formatting for several seconds, followed by Copying files. This part might take as long as 30 minutes, maybe even longer, depending on which edition of Windows 7 the ISO file you have is from, as well as on how fast your computer, USB drive, and USB connection is.

    Tip: The percentage complete indicator may sit on one or more percentages for a long time. This does not mean anything is wrong.
  1. The next screen you see should say Bootable USB device created successfully.

    You can now close the Windows 7 USB DVD Download Tool program. The USB drive can now be used to install Windows 7.
  2. Boot from the USB device to start the Windows 7 setup process.

    Tip: You might need to make changes to the boot order in BIOS if the Windows 7 setup process doesn't start when you try to boot from the USB drive. See How to Change the Boot Order in BIOS if you've never done that.

    Tip: If you still can't get the flash drive to boot, and you also have a UEFI based computer, see Tip #1 below for help.

    Note: If you arrived here from How to Clean Install Windows 7, you can now return to that tutorial and continue installing Windows 7. See How to Install Windows 7 if you weren't doing a clean install or you're not sure what kind of installation to do.

Tips & More Information

  1. When the Windows 7 USB DVD Download Tool formats the flash drive during the process above, it does so using NTFS, a file system that some UEFI systems won't boot from if on a USB stick.

    To get the USB drive to boot on these computers, you should copy the data from the flash drive onto a folder on your computer, then reformat the flash drive using the older FAT32 file system, and then copy that same data back onto the drive.
  2. See my How to Burn an ISO File to USB tutorial for an alternative method for getting a Windows 7 ISO image onto a USB drive. I much prefer the instructions I've outlined above, but if you have trouble getting it to work, the general ISO-to-USB walkthrough should do the trick.
  3. Having trouble installing Windows 7 from a flash drive or other USB device? See Get More Help for information about contacting me on social networks or via email, posting on tech support forums, and more.