Showing posts with label Apache. Show all posts

Apache MESOS

Apache Mesos is an open-source cluster manager designed to manage and deploy distributed applications in a highly efficient, scalable, and fault-tolerant way. Originally developed by UC Berkeley’s AMPLab and later open-sourced by Apache, Mesos abstracts CPU, memory, storage, and other resources across data centers, allowing applications to treat a collection of physical or virtual machines as a single pool of resources.

Key Features and Concepts of Mesos

  1. Resource Abstraction:

    • Mesos abstracts resources like CPU, memory, and storage, offering them to applications as pools rather than tied to specific machines. This enables more efficient resource utilization across a data center.
  2. Two-Level Scheduling:

    • Mesos uses a unique two-level scheduling model. It offers available resources to applications, called "frameworks," which then decide how to use the resources. Mesos itself doesn't schedule applications directly but offers resources to various frameworks (e.g., Hadoop, Spark, Kubernetes), which can then perform their own scheduling.
  3. Fault-Tolerance:

    • Mesos is designed to handle failures gracefully, using techniques such as leader election and task reallocation to maintain reliability even if some nodes or components fail.
  4. Scalability:

    • Mesos is highly scalable and can handle thousands of nodes, making it suitable for very large-scale deployments. It efficiently manages resources even as the cluster grows.
  5. Multi-Tenancy:

    • Multiple frameworks can run simultaneously on Mesos, with different applications sharing resources across clusters. This makes Mesos ideal for environments where multiple teams or services need to share a common infrastructure.
  6. Framework Support:

    • Mesos can support various distributed computing frameworks, such as Apache Spark, Apache Hadoop, and Kubernetes, which use it as the underlying resource manager. This flexibility makes it a versatile option for managing workloads like batch processing, real-time analytics, and containerized applications.

Architecture Overview

Mesos’s architecture consists of two main components:

  • Master Node: Manages and coordinates resources across slave nodes, keeps track of available resources, and offers them to frameworks based on scheduling policies. If a failure occurs, Mesos can elect a new master from a set of backup masters.
  • Slave Nodes: Also called agents, these are the worker nodes that run the tasks assigned by frameworks. Each slave node reports its available resources to the master and performs tasks on behalf of the frameworks.

Use Cases of Mesos

  1. Data Processing: With support for frameworks like Apache Spark and Apache Hadoop, Mesos is well-suited for data-intensive applications.
  2. Container Orchestration: Mesos can run containerized applications and is compatible with Marathon, a Mesos-native framework for managing containerized workloads.
  3. Real-Time Analytics: By managing resources for real-time data processing applications, Mesos helps ensure responsiveness and low-latency processing.
  4. Microservices Management: Mesos’s support for multiple frameworks and resource isolation makes it useful for deploying and managing microservices architectures.

Comparison with Kubernetes

While both Mesos and Kubernetes are often used to manage distributed applications, Kubernetes has become more popular specifically for containerized applications. Mesos, with its broader framework compatibility, is often chosen for mixed environments where different types of workloads (like batch processing and container orchestration) need to coexist.

When to Use Mesos

Apache Mesos is particularly valuable when:

  • You need to run diverse types of workloads, not limited to containerized applications.
  • You require fine-grained control over resource allocation and high scalability.
  • You are managing very large clusters with different teams or services needing to share infrastructure.

In summary, Mesos offers a highly flexible and scalable solution for resource management in data centers, supporting diverse frameworks and enabling efficient workload distribution across large clusters.

Apache oozie

Apache Oozie is a workflow scheduler system used to manage and execute Hadoop jobs. When building a Directed Acyclic Graph (DAG) of tasks using Oozie, you define a workflow where each task or action is a node, and the edges between them dictate the order of execution. Here’s a step-by-step guide on how to create a DAG with Oozie:


1. Set Up Oozie Environment


Before building the DAG, ensure that Oozie is installed and configured on your Hadoop cluster. You’ll need:


• Oozie Server: Running and accessible

• HDFS: Where you will store workflow definitions and dependencies

• Oozie Client: To submit and manage workflows


2. Define the Workflow XML


The DAG is defined in an XML file, typically named workflow.xml, which specifies each task and the dependencies between them. Each node in the DAG can represent various actions, such as MapReduce, Spark, Pig, Hive jobs, or even custom scripts.


Here’s a basic structure of a workflow XML file for Oozie:


<workflow-app xmlns="uri:oozie:workflow:0.5" name="example_workflow">


  <!-- Start node of the workflow -->

  <start to="first_task"/>


  <!-- Define actions -->

  <action name="first_task">

    <map-reduce>

      <job-tracker>${jobTracker}</job-tracker>

      <name-node>${nameNode}</name-node>

      <configuration>

        <!-- Configuration parameters for the job -->

      </configuration>

    </map-reduce>

    <ok to="second_task"/>

    <error to="kill"/>

  </action>


  <action name="second_task">

    <spark xmlns="uri:oozie:spark-action:0.2">

      <job-tracker>${jobTracker}</job-tracker>

      <name-node>${nameNode}</name-node>

      <master>${sparkMaster}</master>

      <mode>cluster</mode>

      <name>example_spark_job</name>

      <class>com.example.SparkJob</class>

      <jar>${sparkJobJar}</jar>

      <!-- Additional Spark job arguments if necessary -->

    </spark>

    <ok to="end"/>

    <error to="kill"/>

  </action>


  <!-- Kill node for error handling -->

  <kill name="kill">

    <message>Workflow failed, error message[${wf:errorMessage(wf:lastErrorNode())}]</message>

  </kill>


  <!-- End node -->

  <end name="end"/>

</workflow-app>


3. Configure the Properties File


Oozie uses a .properties file to define configuration properties. This file includes paths to the workflow, names of HDFS directories, and other variables referenced in the workflow.xml file. Example:


nameNode=hdfs://namenode:8020

jobTracker=jobtracker:8032

queueName=default

oozie.wf.application.path=${nameNode}/user/${user.name}/oozie/workflows/example_workflow

sparkMaster=yarn

sparkJobJar=${nameNode}/user/${user.name}/spark-jobs/example-job.jar


4. Upload the Workflow to HDFS


Upload your workflow files (e.g., workflow.xml, the properties file, and any job-specific files) to a directory in HDFS.


hadoop fs -mkdir -p /user/<username>/oozie/workflows/example_workflow

hadoop fs -put workflow.xml /user/<username>/oozie/workflows/example_workflow

hadoop fs -put job.properties /user/<username>/oozie/workflows/example_workflow


5. Submit and Monitor the Workflow


Submit the workflow to Oozie using the oozie job command with the properties file:


oozie job -oozie http://oozie-server:11000/oozie -config job.properties -run


To monitor the workflow, use:


oozie job -oozie http://oozie-server:11000/oozie -info <job-id>


6. Define Coordinators or Bundles (Optional)


For recurring workflows, you can define coordinators that run the workflow based on time or data availability. A coordinator XML would define the frequency and the triggers to launch your DAG workflow.


Additional Tips


• Transitions: Each action specifies its transition in ok (success) or error (failure) nodes, allowing you to create complex DAGs with conditional paths.

• Fork and Join: You can parallelize tasks by using <fork> and <join> elements in your workflow, where <fork> splits tasks, and <join> synchronizes them back together.


Using these steps, you can build a DAG in Oozie to handle complex workflows, orchestrating a series of dependent and independent jobs in Hadoop.


From Blogger iPhone client

Apache Zeppelin, JupyterLab, and Polynote

Apache Zeppelin, JupyterLab, and Polynote are all interactive notebooks that allow you to write and run code, visualize data, and collaborate with others. They are all open-source and free to use.

Here is a comparison of the three notebooks:

FeatureApache ZeppelinJupyterLabPolynote
Programming languagesPython, Scala, R, SQL, Hive, Pig, etc.Python, R, Julia, Scala, JavaScript, etc.Python, R, SQL, Scala, etc.
VisualizationsCharts, graphs, tables, images, etc.Charts, graphs, tables, images, etc.Charts, graphs, tables, images, etc.
CollaborationYesYesYes
ExtensibilityPluginsExtensionsPlugins
Community supportLarge and activeLarge and activeGrowing

Apache Zeppelin is a web-based notebook that is designed for data scientists and engineers. It is known for its flexibility and extensibility. Zeppelin has a large number of plugins that can be used to add new features and functionality.

JupyterLab is a web-based notebook that is designed for data scientists, researchers, and educators. It is known for its ease of use and its rich feature set. JupyterLab is the successor to the popular Jupyter Notebook.

Polynote is a web-based notebook that is designed for data scientists and engineers. It is known for its speed and its ability to handle large datasets. Polynote is a newer notebook, but it is growing in popularity.

The best notebook for you will depend on your specific needs and requirements. If you are looking for a flexible and extensible notebook, Apache Zeppelin is a good choice. If you are looking for an easy-to-use notebook with a rich feature set, JupyterLab is a good choice. If you are looking for a fast notebook that can handle large datasets, Polynote is a good choice.

Here are some additional things to consider when choosing an interactive notebook:

  • Your programming language: Make sure the notebook supports the programming languages you need to use.
  • Your data visualization needs: Consider the types of visualizations you need to create and the features that are important to you.
  • Your collaboration needs: If you need to collaborate with others, make sure the notebook supports collaboration.
  • Your extensibility needs: If you need to add new features or functionality to the notebook, make sure it is extensible.
  • The community support: Make sure the notebook has a large and active community that can provide support and resources.

Apache nifi

Apache NiFi is an open-source, scalable, distributed data integration platform. It is used to automate the flow of data between systems. NiFi can be used to process data in real time or in batches. It can also be used to integrate data from a variety of sources, including databases, files, and streaming data.

NiFi is a powerful tool that can be used to solve a variety of data integration problems. It is a good choice for organizations that need to process large amounts of data quickly and efficiently.

Here are some of the features of Apache NiFi:

  • Scalability: NiFi is scalable and can be used to process large amounts of data.
  • Distributed: NiFi is distributed and can be deployed on a cluster of machines.
  • Flexibility: NiFi is flexible and can be used to process data in a variety of ways.
  • Extensibility: NiFi is extensible and can be customized to meet specific needs.
  • Community support: NiFi has a large and active community that provides support and resources.

If you are looking for a powerful and flexible data integration platform, Apache NiFi is a good choice.

Here are some of the use cases of Apache NiFi:

  • Data ingestion: NiFi can be used to ingest data from a variety of sources, including databases, files, and streaming data.
  • Data processing: NiFi can be used to process data in real time or in batches.
  • Data routing: NiFi can be used to route data to different destinations, such as databases, files, and applications.
  • Data transformation: NiFi can be used to transform data by changing its format or structure.
  • Data enrichment: NiFi can be used to enrich data by adding additional information to it.
  • Data anonymization: NiFi can be used to anonymize data by removing sensitive information from it.

If you are looking to solve a data integration problem, Apache NiFi is a good place to start.


Apache Spark

Apache Spark is an open-source unified analytics engine for large-scale data processing. It can be used for batch processing, streaming, machine learning, and graph processing. Spark is known for its speed and scalability. It can process data much faster than traditional data processing systems, such as Hadoop.

Spark is a general-purpose engine that can be used for a variety of tasks. Here are some of the most common uses of Spark:

  • Batch processing: Spark can be used to process large datasets in batches. This is useful for tasks such as data cleaning, data transformation, and data analysis.
  • Streaming: Spark can be used to process data streams. This is useful for tasks such as monitoring real-time events and detecting anomalies.
  • Machine learning: Spark can be used to train and deploy machine learning models. This is useful for tasks such as fraud detection, customer segmentation, and product recommendations.
  • Graph processing: Spark can be used to process graph data. This is useful for tasks such as social network analysis and fraud detection.

Spark is a powerful tool that can be used to solve a variety of big data problems. It is a good choice for organizations that need to process large amounts of data quickly and efficiently.

Here are some of the advantages of using Apache Spark:

  • Speed: Spark is much faster than traditional data processing systems, such as Hadoop.
  • Scalability: Spark can be scaled to handle very large datasets.
  • Ease of use: Spark is easy to use and can be learned quickly.
  • Flexibility: Spark can be used for a variety of tasks, including batch processing, streaming, machine learning, and graph processing.
  • Community support: Spark has a large and active community that provides support and resources.

If you are looking for a fast, scalable, and easy-to-use big data processing engine, Apache Spark is a good choice.

Here are some of the disadvantages of using Apache Spark:

  • Complexity: Spark can be complex to learn and use.
  • Cost: Spark can be more expensive than other big data processing systems.
  • Resource requirements: Spark can require a lot of resources, such as memory and CPU.
  • Security: Spark can be a security risk if not properly configured.

Overall, Apache Spark is a powerful and versatile big data processing engine that can be used for a variety of tasks. However, it is important to be aware of the challenges and limitations of Spark before using it.

Installing Apache - Ubuntu 18.04

Introduction

The Apache HTTP server is the most widely-used web server in the world. It provides many powerful features, including dynamically loadable modules, robust media support, and extensive integration with other popular software.
In this guide, we’ll explain how to install an Apache web server on your Ubuntu 18.04 server. For a more detailed version of this tutorial, please refer to How To Install the Apache Web Server on Ubuntu 18.04.

Prerequisites

Before you begin this guide, you should have the following:
  • An Ubuntu 18.04 server and a regular, non-root user with sudo privileges. Additionally, you will need to enable a basic firewall to block non-essential ports. You can learn how to configure a regular user account and set up a firewall for your server by following our initial server setup guide for Ubuntu 18.04.
When you have an account available, log in as your non-root user to begin.

Step 1 — Installing Apache

Apache is available within Ubuntu’s default software repositories, so you can install it using conventional package management tools.
Update your local package index:
  • sudo apt update
Install the apache2 package:
  • sudo apt install apache2

Step 2 — Adjusting the Firewall

Check the available ufw application profiles:
  • sudo ufw app list
Output
Available applications: Apache Apache Full Apache Secure OpenSSH
Let’s enable the most restrictive profile that will still allow the traffic you’ve configured, permitting traffic on port 80 (normal, unencrypted web traffic):
  • sudo ufw allow 'Apache'
Verify the change:
  • sudo ufw status
Output
Status: active To Action From -- ------ ---- OpenSSH ALLOW Anywhere Apache ALLOW Anywhere OpenSSH (v6) ALLOW Anywhere (v6) Apache (v6) ALLOW Anywhere (v6)

Step 3 — Checking your Web Server

Check with the systemd init system to make sure the service is running by typing:
  • sudo systemctl status apache2
Output
● apache2.service - The Apache HTTP Server Loaded: loaded (/lib/systemd/system/apache2.service; enabled; vendor preset: enabled) Drop-In: /lib/systemd/system/apache2.service.d └─apache2-systemd.conf Active: active (running) since Tue 2018-04-24 20:14:39 UTC; 9min ago Main PID: 2583 (apache2) Tasks: 55 (limit: 1153) CGroup: /system.slice/apache2.service ├─2583 /usr/sbin/apache2 -k start ├─2585 /usr/sbin/apache2 -k start └─2586 /usr/sbin/apache2 -k start
Access the default Apache landing page to confirm that the software is running properly through your IP address:
http://your_server_ip
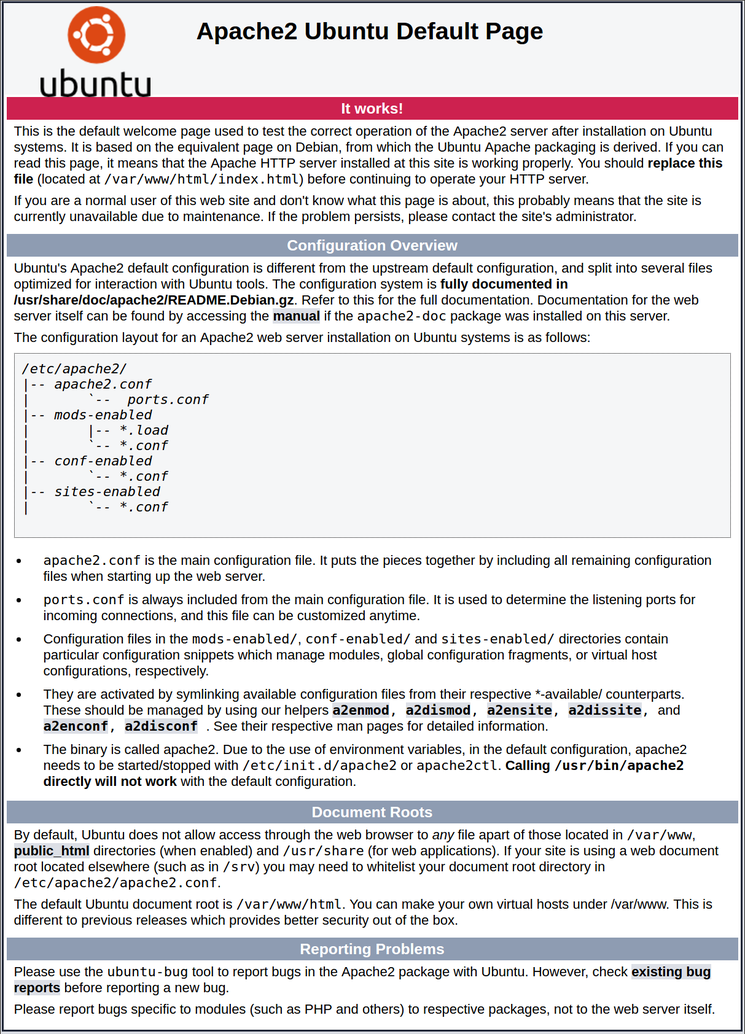
You should see the default Ubuntu 18.04 Apache web page:
Apache default page
When using the Apache web server, you can use virtual hosts (similar to server blocks in Nginx) to encapsulate configuration details and host more than one domain from a single server. We will set up a domain called your_domain, but you should replace this with your own domain name. To learn more about setting up a domain name with DigitalOcean, see our introduction to DigitalOcean DNS.
Create the directory for your_domain:
sudo mkdir /var/www/your_domain
Assign ownership of the directory:
  • sudo chown -R $USER:$USER /var/www/your_domain
The permissions of your web roots should be correct if you haven’t modified your unmask value, but you can make sure by typing:
  • sudo chmod -R 755 /var/www/your_domain
Create a sample index.html page using nano or your favorite editor:
  • nano /var/www/your_domain/index.html
Inside, add the following sample HTML:
/var/www/your_domain/index.html

    
        Welcome to <span class="highlight" style="box-sizing: border-box; background: 0px 0px; color: rgb(233, 72, 73); display: inline;">Your_domain</span>!


Success! The your_domain virtual host is working!

Save and close the file when you are finished.
Make a new virtual host file at /etc/apache2/sites-available/your_domain.conf:
  • sudo nano /etc/apache2/sites-available/your_domain.conf
Paste in the following configuration block, updated for our new directory and domain name:
/etc/apache2/sites-available/your_domain.conf

    ServerAdmin webmaster@localhost
    ServerName your_domain
    ServerAlias your_domain
    DocumentRoot /var/www/your_domain
    ErrorLog ${APACHE_LOG_DIR}/error.log
    CustomLog ${APACHE_LOG_DIR}/access.log combined

Save and close the file when you are finished.
Enable the file with a2ensite:
  • sudo a2ensite your_domain.conf
Disable the default site defined in 000-default.conf:
  • sudo a2dissite 000-default.conf
Test for configuration errors:
  • sudo apache2ctl configtest
You should see the following output:
Output
Syntax OK
Restart Apache to implement your changes:
  • sudo systemctl restart apache2
Apache should now be serving your domain name. You can test this by navigating to http://your_domain, where you should see something like this:
Apache virtual host example

Conclusion

Now that you have your web server installed, you have many options for the type of content to serve and the technologies you want to use to create a richer experience.
If you’d like to build out a more complete application stack, check out this article on how to configure a LAMP stack on Ubuntu 18.04.