Showing posts with label Windows Server 2012. Show all posts

Importing the Certificate with MMC - Windows Server 2012, Windows Server 2016


Importing the Certificate with MMC

  1. Open MMC on your computer (you can locate this program by typing “mmc” in your Windows search bar).
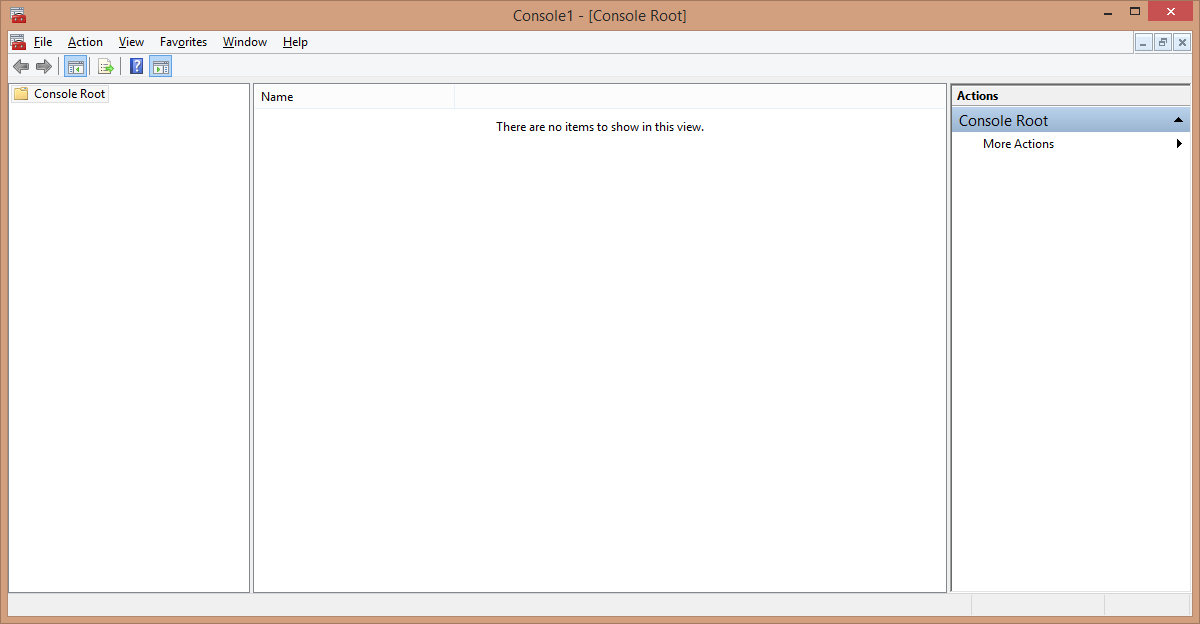
    IIS7_No_Private_Key_Error_fix_01
  2. Select “File > Add/Remove Snap-in” (or type Control-M). Select “Certificates” and click the Add button.
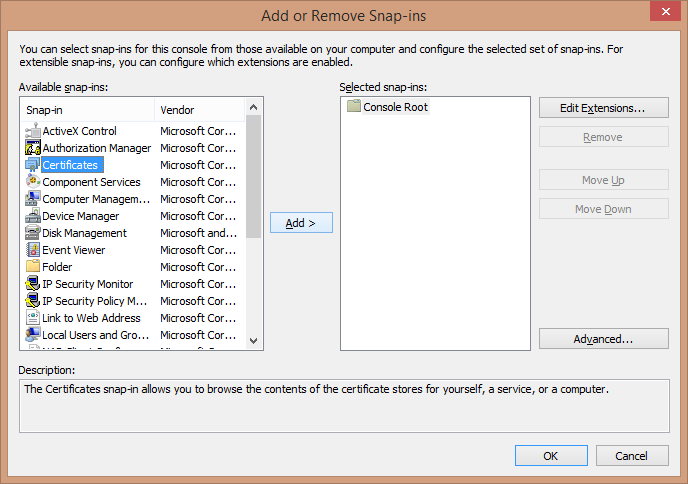
    IIS7_No_Private_Key_Error_fix_02
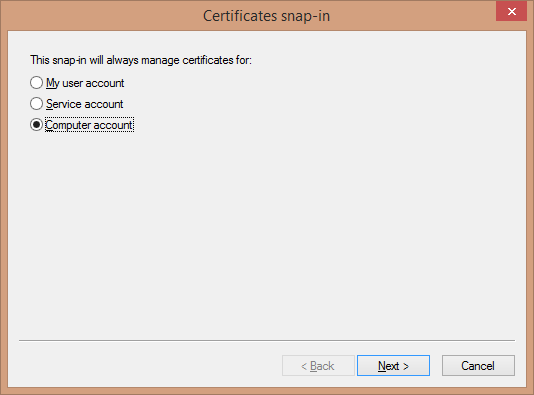
  3. Select “Computer account” and click Next
    IIS7_No_Private_Key_Error_fix_03_1
    …then direct the snap-in to manage the “Local computer” and click Finish.
    IIS7_No_Private_Key_Error_fix_03_2
  4. Click OK to add the snap-in.
  5. Next, navigate to the “Certificates (Local Computer) > Personal > Certificates” folder.
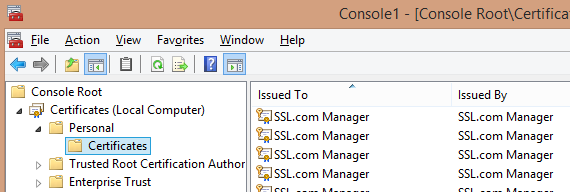
    IIS7_No_Private_Key_Error_fix_05_1
  6. Right-click the folder and select “All tasks > Import” from the menu to open the Certificate Import Wizard.
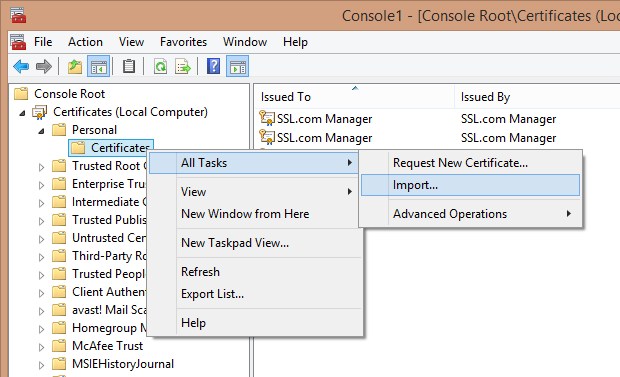
    IIS7_No_Private_Key_Error_fix_06_1
  7. In the Import Wizard, make sure “Local Machine” is selected and hit Next.
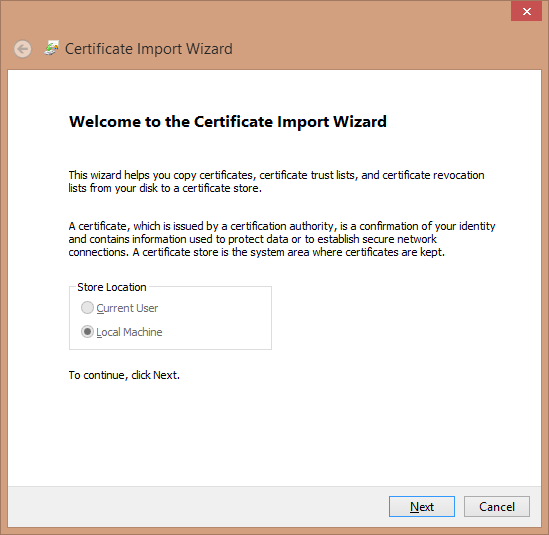
    IIS7_No_Private_Key_Error_fix_07_1
  8. Locate and designate the target certificate (it should be in the .p7b format), then press Next.
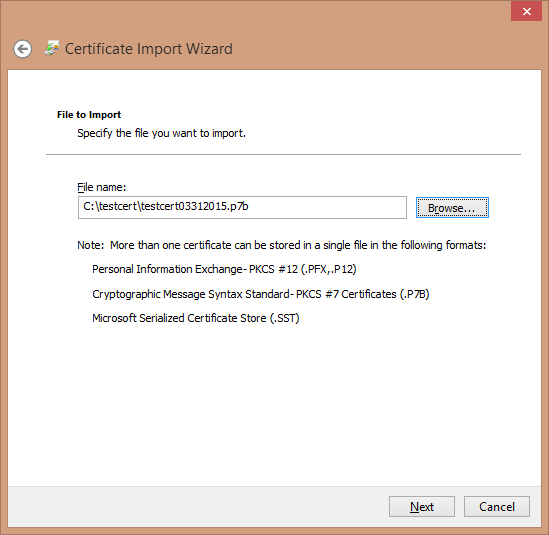
    IIS7_No_Private_Key_Error_fix_08_21
  9. Set the wizard to place the imported certificates in the “Personal” store. Hit Next to proceed.
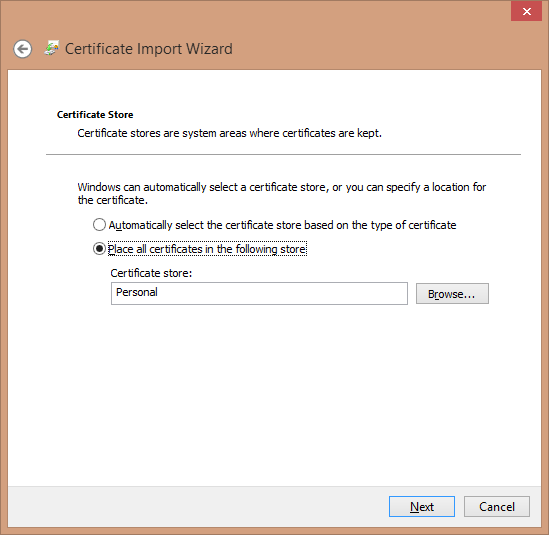
    IIS7_No_Private_Key_Error_fix_09
  10. Check the settings, then click Finish to import the certificate.
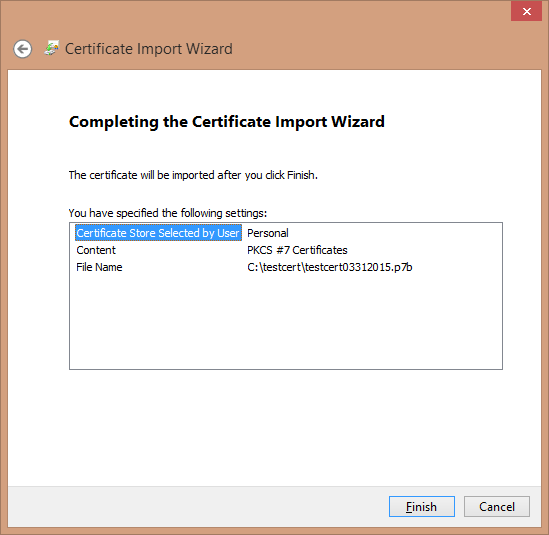
    IIS7_No_Private_Key_Error_fix_10_11_12.

Capture the Serial Number

  1. Double-click to open the certificate, then select the “Details” tab to find and capture the serial number.
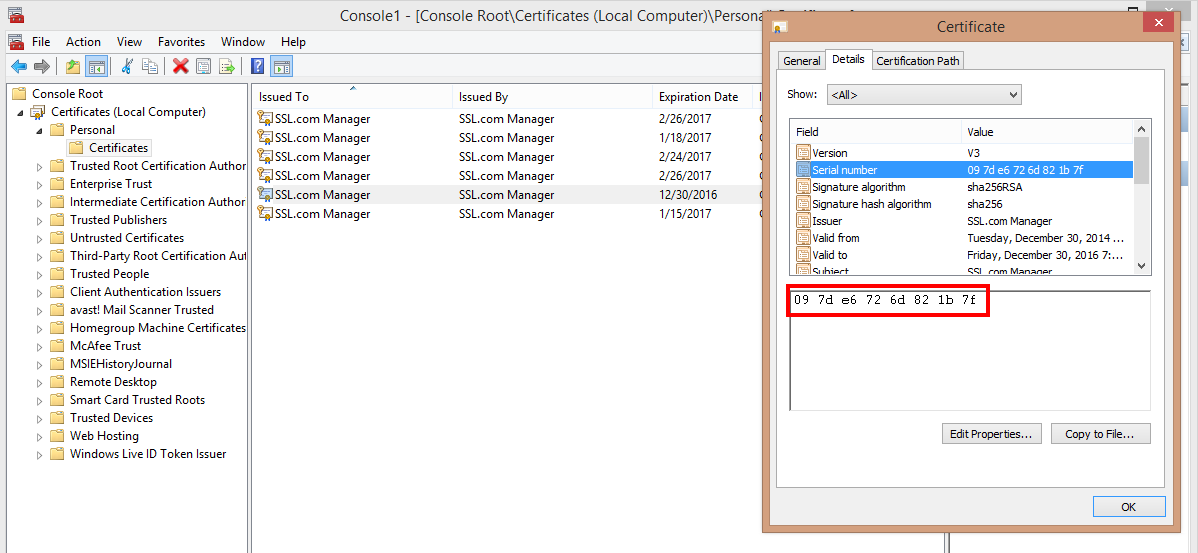
    IIS7_No_Private_Key_Error_fix_11_1

Run the certutil Program

  1. In order to perform the next step, you will need to open a command line session with administrator privileges. The most straightforward way to do this is to perform a search for “cmd”, then right-click the cmd icon and select “Run as administrator”. (Choose “Yes” if asked if you wish to allow this program to make changes on the computer.)
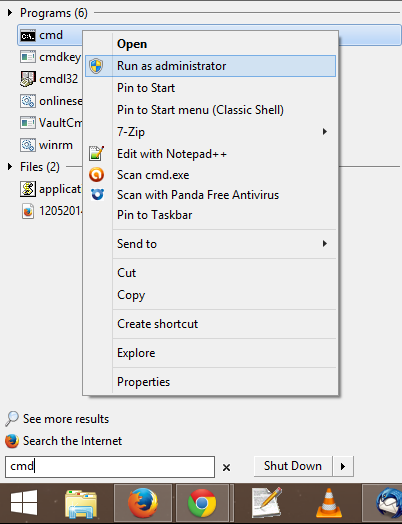
    IIS7_No_Private_Key_Error_fix_12
  2. At the command line, enter the following command, using your captured serial number:
    certutil -repairstore my "PLACE_SERIAL_NUMBER_HERE"
    Make certain and place the serial number between the quote marks as shown.  **It is best to actually type the serial number as the paste function can sometimes lose a character in the cmd window.
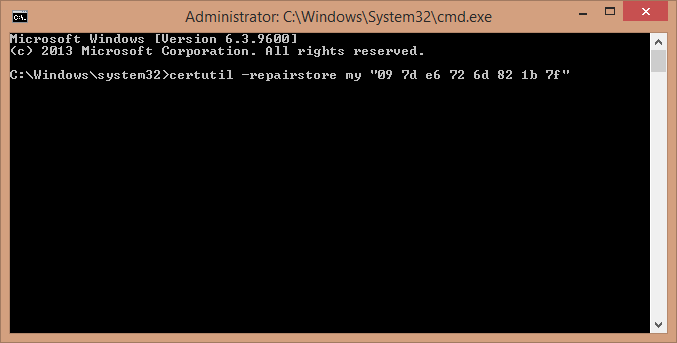
    IIS7_No_Private_Key_Error_fix_13
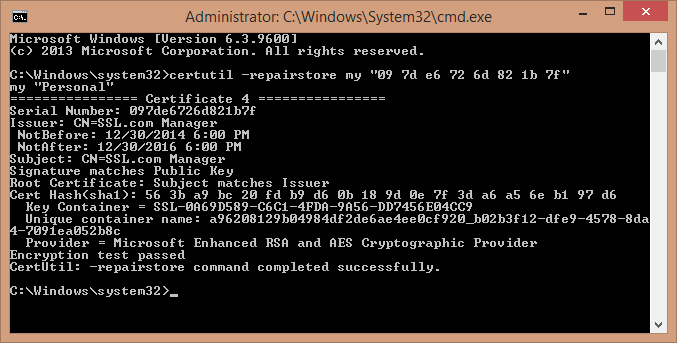
  3. If successful, this command will return some information about the certificate and a confirmation message.
    IIS7_No_Private_Key_Error_fix_14
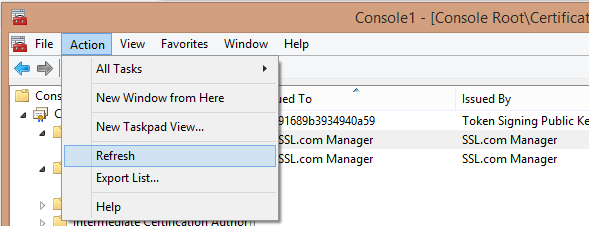
  4. Close the command session and refresh MMC.
    IIS7_No_Private_Key_Error_fix_15

Export the Corrected Certificate

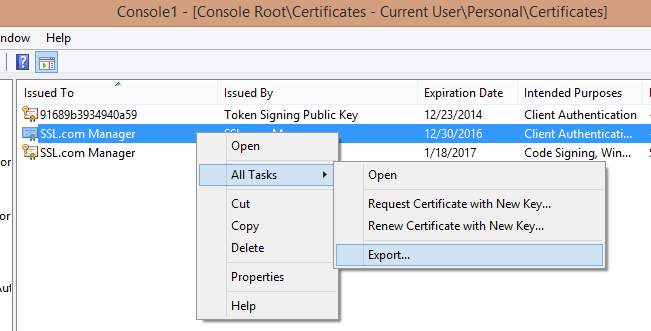
  1. Right-click the certificate and select “All tasks > Export” to open the Certificate Export Wizard.
    IIS7_No_Private_Key_Error_fix_16
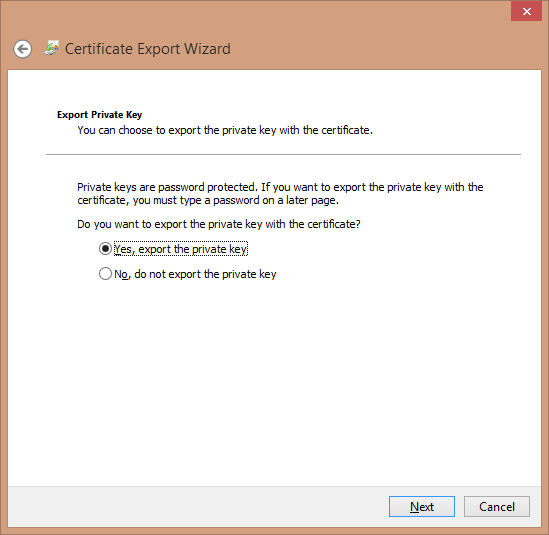
  2. After clicking through the Wizard’s welcome page, make sure that the option is set to “Yes, export the private key” and click Next.
    IIS7_No_Private_Key_Error_fix_17_1
  3. Choose the format for the exported certificate (here, a PKCS # 12 -encoded, or .PFX file). Make sure to check the boxes to include all certificates in the path and to export all extended properties, then click Next.
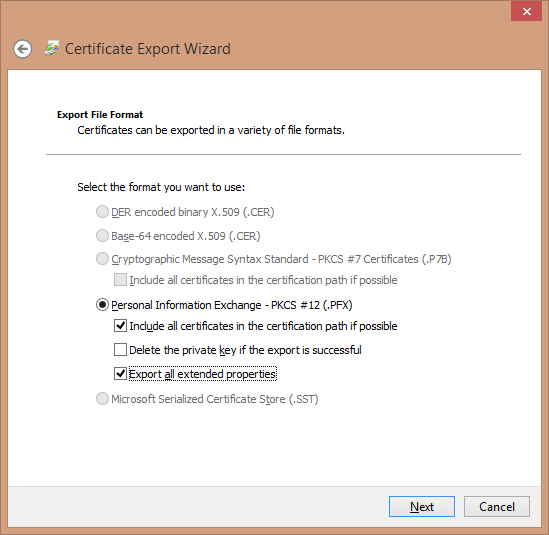
    IIS7_No_Private_Key_Error_fix_18_1
  4. You will be prompted for a password to protect this certificate bundle (a good idea, since it incorporates your private key). Create and confirm your password, then click Next.
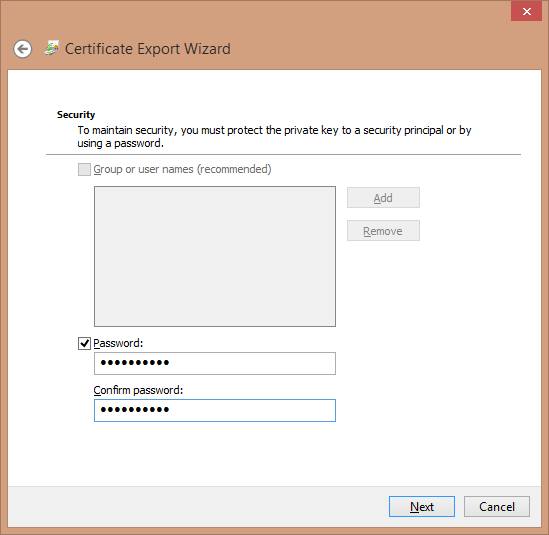
    IIS7_No_Private_Key_Error_fix_19_1
  5. Select the name and location of the file you are exporting. You may browse to a location you prefer – make sure to save the file with the .pfx extension.
    Note: Including the date is a good way to differentiate this certificate file from other ones.
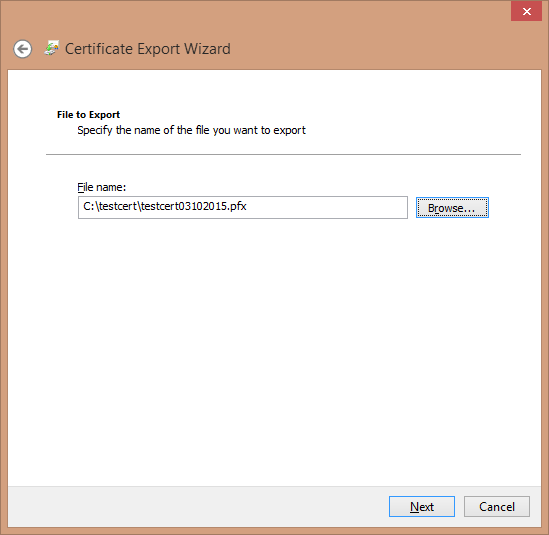
    IIS7_No_Private_Key_Error_fix_20_1
  6. Review the information. If this all looks correct, click Finish.
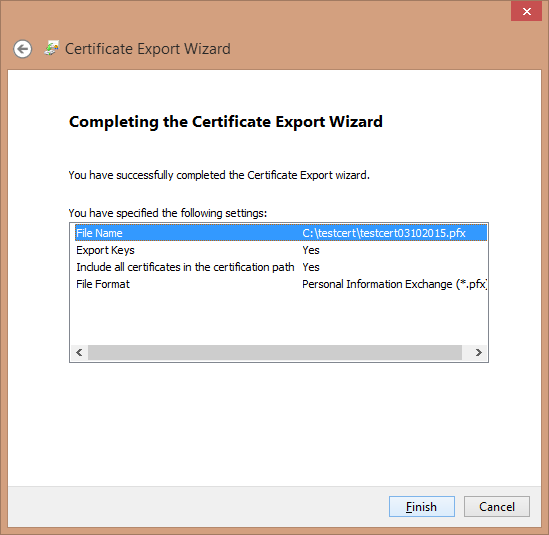
    IIS7_No_Private_Key_Error_fix_21_1
  7. You will receive confirmation that the export was successful.
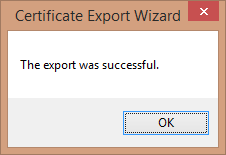
    IIS7_No_Private_Key_Error_fix_22

Re-importing the Certificate with IIS

You will now have a file you can re-import via IIS without throwing the “No Private Key” error. SSL.com has general instructions on how to do this in a separate article here. For our purposes, just remember to choose “Import” instead of “Complete Certificate Request” when processing this certificate and to enter the password when prompted.
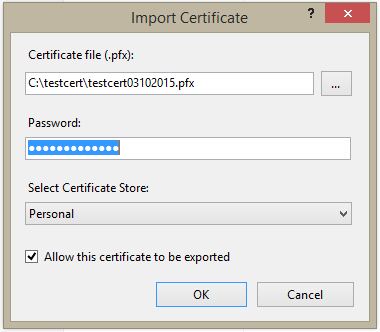
IIS7_No_Private_Key_Error_fix_iis_1
Remember also to set the Type to “https” and the Port to “443” (unless otherwise instructed by your network administrator) when binding the certificate to the site.
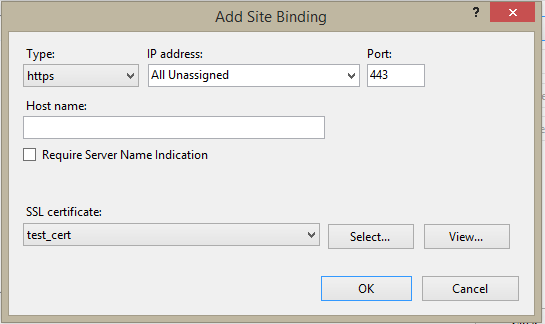
IIS7_No_Private_Key_Error_fix_iis_2

Installing Solr 6 as a Windows web service

Install on the windows platform

https://nssm.cc/download

Install Java

http://www.oracle.com/technetwork/java/javase/downloads/jre8-downloads-2133155.html

Goal

Get Solr 6.1 running as a Windows Service and have it recover on OutOfMemory Exceptions.

Install Solr 6.1 as a Service

  1. Download NSSM
  2. Extract nssm.exe somewhere
  3. Create solr_start_6.1.0.cmd (this is a Windows Command file that does all of my configuration--yours will definitely be different):
    C:\apache\solr-6.1.0\bin\solr start -f -h node3 -c -p 8983 -z "zk1:2181,zk2:2181,zk3:2181" -m 128m -s C:\apache\solr-6-cores
    NOTE: The -f to run the script in the foreground.  I set the JVM heap size to 128 MB (we want this thing to crash and burn to test out OutOfMemoryException restart!).
  4. Test your script to make sure it starts solr and you can access your Solr Admin UI in a web browser
  5. Open a command window and navigate to your nssm.exe directory
  6. nssm.exe install "Apache - Solr 6.1"
    1. Application Tab
      1. Path: Select your solr_start_6.1.0.cmd from earlier
      2. Startup Directory: set it to the directory containing your script (should populate by default)
    2. Details Tab
      1. Display Name: Apache - Solr 6.1
      2. Startup type: Automatic
    3. Log on Tab
      1. Make sure you specify an account that has administrator-level permissions (Use your account if you're stuck here--but make sure to set it to something production-worthy later)
    4. I/O Tab
      1. I/O Redirection
        1. Output (stdout): Set this to something like path\to\my\solr\cmd\script\dir\solr-6.1.0-out.txt
        2. Error (stderr): path\to\my\solr\cmd\script\dir\solr-6.1.0-error.txt
      2. File rotation
        1. Check Rotate files
        2. Check Rotate while service is running
        3. Restrict rotation to files bigger than: (use common sense here, I did 5 MB, so 5242880 went into the box)
    5. Click Install Service
  7. Open Component Services and select Apache - Solr 6.1
  8. Start the service
  9. Validate that it came up by going to your Admin UI webpage

    Make Solr Service respond to Out Of Memory Exceptions

    1. Navigate to this JIRA ticket
    2. Download oom_win.cmd and place it in your solr\bin directory next to solr.cmd
    3. Open solr.cmd in a text editor
    4. Find all the places where the script starts the server:
      1. Search for /solr_gc.log
    5. Immediately after /solr_gc.log, paste the following:
      -XX:OnOutOfMemoryError="%SOLR_SERVER_DIR%\..\bin\oom_win.cmd %SOLR_PORT% !SOLR_LOGS_DIR!"
      1. I had to replace two lines.  NOTE that this is just the manual way of applying the patch file associated with the JIRA ticket above.  If you want, apply it however you want.
    6. Now that we've made our changes, go ahead and restart our new Solr 6.1 service so it knows to kill the process on OutOfMemory errors.
    7. To force an OutOfMemoryError, query *:* and return 1000000 rows
      1. If you have a decent amount of content, this should force an OutOfMemory exception.  If you don't have a lot of content, do whatever you can to make it do a lot of memory-intensive work.  Perhaps consider lowering the JVM memory, too.
      2. You should see the web server go offline temporarily and then come back online
    8. Now that you've seen it restart and come back online, let's give the JVM a good amount of RAM so that it doesn't run out of memory every other request.  Just edit your solr_start_6.1.0.cmd file and change the -m 128m to -m 4g (128 MB to 4 GB)
    9. Save and restart the service
    10. Confirm that you have the new amount of RAM for the JVM by visiting the Dashboard tab in the Admin UI

    Logs

    When the OutOfMemory Killer runs, it generates a log file in the normal log directory.  Navigate to that directory and you should see a file that looks something like: solr_oom_killer-9000-2016-07-06_13_59_39.  Now you can know when this script runs and hopefully anticipate it in the future or make changes to not get it.


    Weak Diffie-Hellman and the Logjam Attack - Revoke from Web Server

    Diffie-Hellman key exchange is a popular cryptographic algorithm that allows Internet protocols to agree on a shared key and negotiate a secure connection. It is fundamental to many protocols including HTTPS, SSH, IPsec, SMTPS, and protocols that rely on TLS.
    We have uncovered several weaknesses in how Diffie-Hellman key exchange has been deployed:
    1. Logjam attack against the TLS protocol. The Logjam attack allows a man-in-the-middle attacker to downgrade vulnerable TLS connections to 512-bit export-grade cryptography. This allows the attacker to read and modify any data passed over the connection. The attack is reminiscent of the FREAK attack, but is due to a flaw in the TLS protocol rather than an implementation vulnerability, and attacks a Diffie-Hellman key exchange rather than an RSA key exchange. The attack affects any server that supports DHE_EXPORTciphers, and affects all modern web browsers. 8.4% of the Top 1 Million domains were initially vulnerable.
    2. Threats from state-level adversaries. Millions of HTTPS, SSH, and VPN servers all use the same prime numbers for Diffie-Hellman key exchange. Practitioners believed this was safe as long as new key exchange messages were generated for every connection. However, the first step in the number field sieve—the most efficient algorithm for breaking a Diffie-Hellman connection—is dependent only on this prime. After this first step, an attacker can quickly break individual connections.
      We carried out this computation against the most common 512-bit prime used for TLS and demonstrate that the Logjam attack can be used to downgrade connections to 80% of TLS servers supporting DHE_EXPORT. We further estimate that an academic team can break a 768-bit prime and that a nation-state can break a 1024-bit prime. Breaking the single, most common 1024-bit prime used by web servers would allow passive eavesdropping on connections to 18% of the Top 1 Million HTTPS domains. A second prime would allow passive decryption of connections to 66% of VPN servers and 26% of SSH servers. A close reading of published NSA leaks shows that the agency's attacks on VPNs are consistent with having achieved such a break.

    Full Technical Paper

    Imperfect Forward Secrecy: How Diffie-Hellman Fails in Practice
    David Adrian, Karthikeyan Bhargavan, Zakir Durumeric, Pierrick Gaudry, Matthew Green, J. Alex Halderman, Nadia Heninger, Drew Springall, Emmanuel Thomé, Luke Valenta, Benjamin VanderSloot, Eric Wustrow, Santiago Zanella-Béguelin, and Paul Zimmermann
    22nd ACM Conference on Computer and Communications Security (CCS ’15), Denver, CO, October 2015
    Best Paper Award Winner
    More: Full paper | Talk slides | Bibtex

    Additional Information

    Contact the Team

    This study was performed by computer scientists at CNRS, Inria Nancy-Grand Est, Inria Paris-Rocquencourt, Microsoft Research, Johns Hopkins University, University of Michigan, and the University of Pennsylvania: David AdrianKarthikeyan BhargavanZakir Durumeric,Pierrick GaudryMatthew GreenJ. Alex HaldermanNadia HeningerDrew SpringallEmmanuel ThoméLuke ValentaBenjamin VanderSloot,Eric WustrowSantiago Zanella-Beguelin, and Paul Zimmermann. The team can be contacted at weakdh-team@umich.edu.

    Who is Affected?

    Websites, mail servers, and other TLS-dependent services that support DHE_EXPORT ciphers are at risk for the Logjam attack. We use Internet-wide scanning to measure who is vulnerable.
    ProtocolVulnerable to Logjam
    HTTPS — Top 1 Million Domains8.4%
    HTTPS — Browser Trusted Sites3.4%
    SMTP+StartTLS — IPv4 Address Space14.8%
    POP3S — IPv4 Address Space8.9%
    IMAPS — IPv4 Address Space8.4%
    Websites that use one of a few commonly shared 1024-bit Diffie-Hellman groups may be susceptible to passive eavesdropping from an attacker with nation-state resources. Here, we show how various protocols would be affected if a single 1024-bit group were broken in each protocol, assuming a typical up-to-date client (e.g., most recent version of OpenSSH or up-to-date installation of Chrome).
    Vulnerable if most common 1024-bit group is broken
    HTTPS — Top 1 Million Domains17.9%
    HTTPS — Browser Trusted Sites6.6%
    SSH — IPv4 Address Space25.7%
    IKEv1 (IPsec VPNs) — IPv4 Address Space66.1%

    What Should I Do?

    If you run a server…

    If you have a web or mail server, you should disable support for export cipher suites and use a 2048-bit Diffie-Hellman group. We have published a Guide to Deploying Diffie-Hellman for TLS with step-by-step instructions. If you use SSH, you should upgrade both your server and client installations to the most recent version of OpenSSH, which prefers Elliptic-Curve Diffie-Hellman Key Exchange.

    If you use a browser…

    Make sure you have the most recent version of your browser installed, and check for updates frequently. Google Chrome (including Android Browser), Mozilla Firefox, Microsoft Internet Explorer, and Apple Safari are all deploying fixes for the Logjam attack.

    If you’re a sysadmin or developer …


    Make sure any TLS libraries you use are up-to-date, that servers you maintain use 2048-bit or larger primes, and that clients you maintain reject Diffie-Hellman primes smaller than 1024-bit.

    Windows Server 2012: How to Add an Account to a Local Administrator Group

    The new interactions on Server Manager as well as the next generation of administration interface may get you stuck on doing common administrative tasks which you have done quickly on Windows Server 2008. One of the tasks I have to do is add an account to the Local Administrator group. In this article, I will show you the step-by-step guidance on how to add an account to Local Administrator group. This article helps Windows Server 2012 beginning administrators facilitate server management as well as get Windows Server 2010 knowledge.

    Open Server Manager. Click Tool in the right corner of Server Manager and then select Computer Management.


    In the Computer Management windows, expand Local Users and Groups and select Groups. Double click on Administrators group.


    In the Administrators Properties, click Add...In the Select Users, Computers, Service Accounts, or Groups windows, type the account you want to add to Local Administrator group and then click OK.


    Click OK.

    Note: If you are on the Domain Controller, you cannot find Local Users and Groups in the Computer Management. In the case you want to add any account to the local Administrator group on the domain controller machine, just open Active Directory Users and Computer.

    Windows Server 2012 - Checking port status and adding exception

    • Execute the following command and look for a ":3306" listener (you did not mention UDP/TCP). This will confirm there is something running on the port.
      netstat -a -n
    • After this, if you are expecting incoming connections on this port and feel that the firewall may be blocking them, you could start windows firewall logging and check the logs for dropped connections
      • Go to the Windows Firewall, Advanced settings
      • Click on the Settings button next to "Local Area Connection"
      • Select "Log dropped packets"
      • Look at the log file location (if not present define one)
      • Click OK
      • Now, when the connection attempt is made (assuming you know when this is done), look at the log file for a drop on port 3306.
      • If this is seen, you will want to add an exception for this port.
    • There is one more command to check the firewall state
      (Update for Windows 7 users -- as referred by Nick below -- use netsh advfirewall firewall)
      netsh firewall show state
      • this will list the blocked ports as well as active listening ports with application associations
    • This command will dump the Windows firewall configuration detail
      netsh firewall show config