Showing posts with label Windows Server 2016. Show all posts

Importing the Certificate with MMC - Windows Server 2012, Windows Server 2016


Importing the Certificate with MMC

  1. Open MMC on your computer (you can locate this program by typing “mmc” in your Windows search bar).
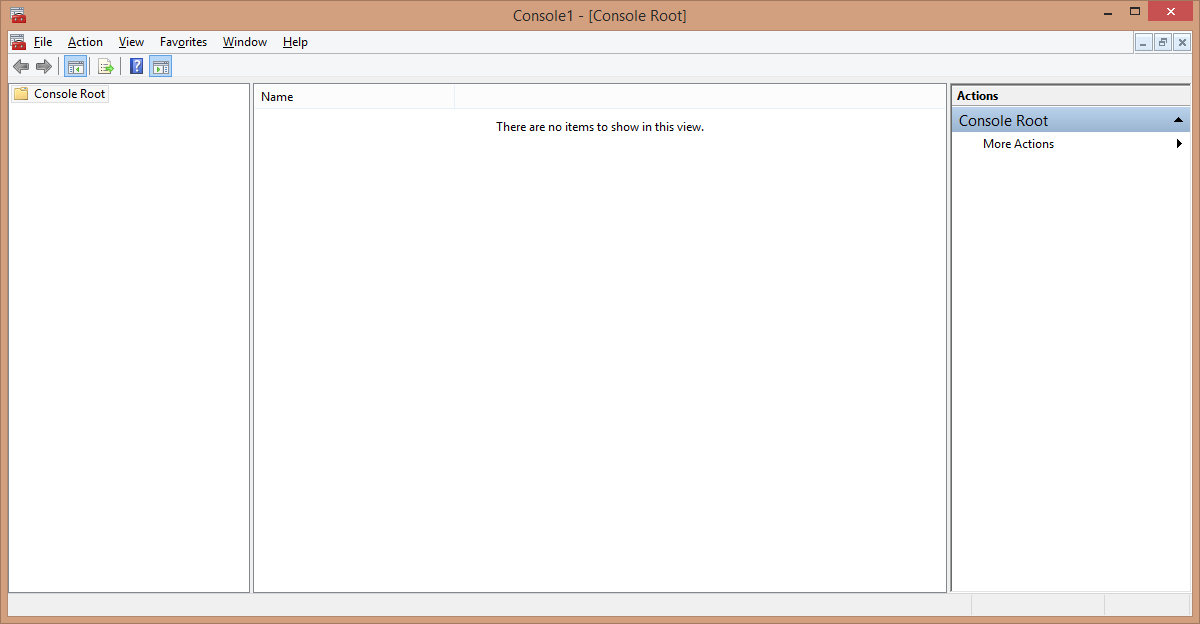
    IIS7_No_Private_Key_Error_fix_01
  2. Select “File > Add/Remove Snap-in” (or type Control-M). Select “Certificates” and click the Add button.
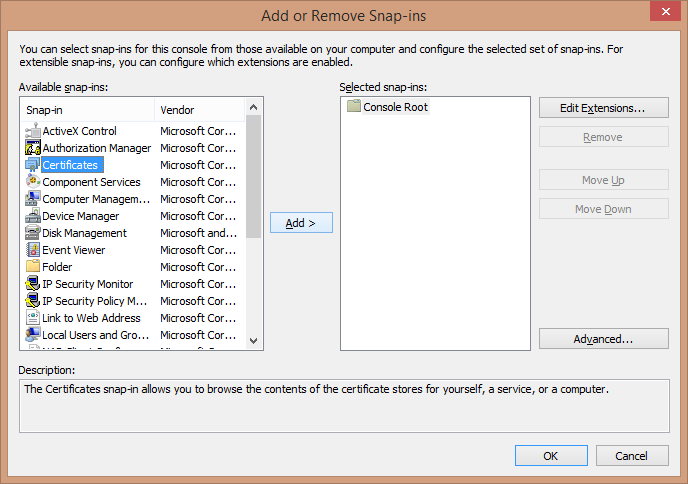
    IIS7_No_Private_Key_Error_fix_02
  3. Select “Computer account” and click Next…
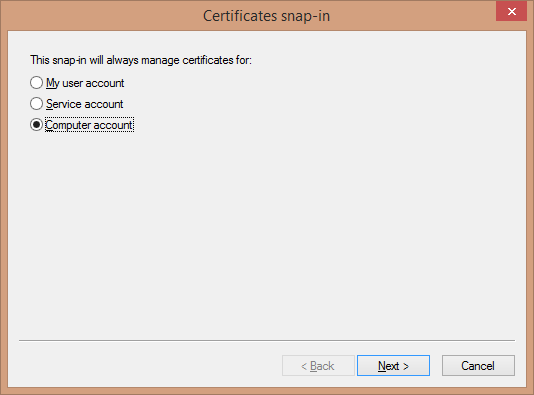
    IIS7_No_Private_Key_Error_fix_03_1
    …then direct the snap-in to manage the “Local computer” and click Finish.
    IIS7_No_Private_Key_Error_fix_03_2
  4. Click OK to add the snap-in.
  5. Next, navigate to the “Certificates (Local Computer) > Personal > Certificates” folder.
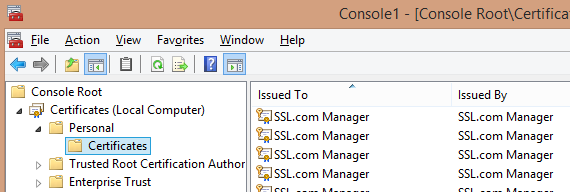
    IIS7_No_Private_Key_Error_fix_05_1
  6. Right-click the folder and select “All tasks > Import” from the menu to open the Certificate Import Wizard.
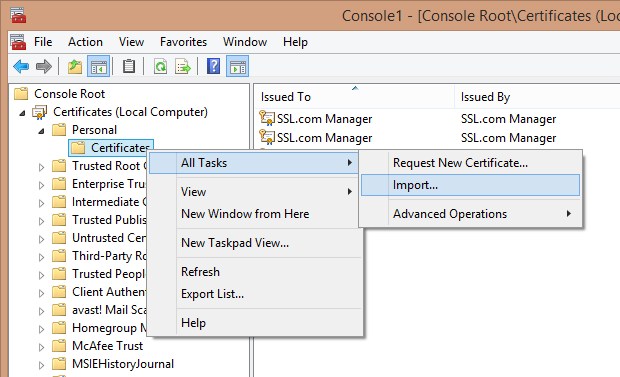
    IIS7_No_Private_Key_Error_fix_06_1
  7. In the Import Wizard, make sure “Local Machine” is selected and hit Next.
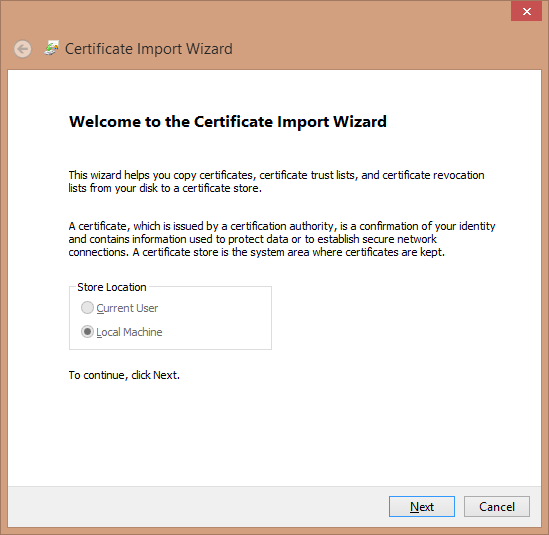
    IIS7_No_Private_Key_Error_fix_07_1
  8. Locate and designate the target certificate (it should be in the .p7b format), then press Next.
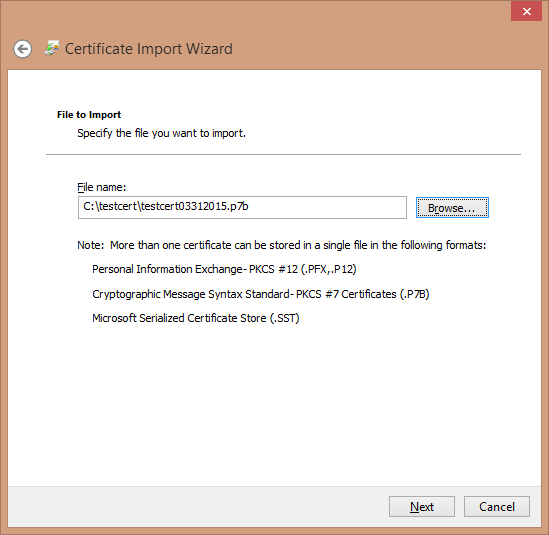
    IIS7_No_Private_Key_Error_fix_08_21
  9. Set the wizard to place the imported certificates in the “Personal” store. Hit Next to proceed.
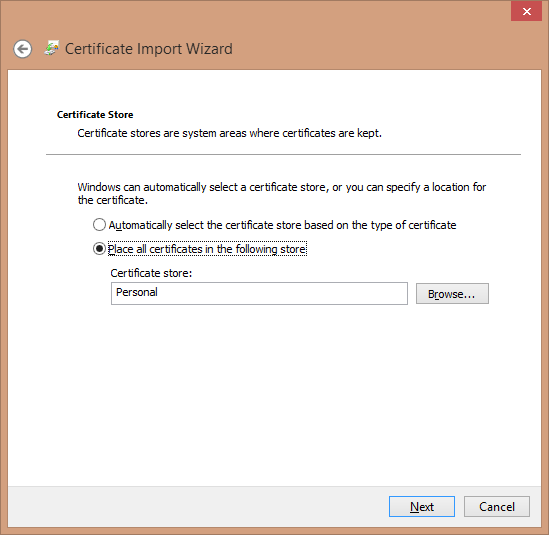
    IIS7_No_Private_Key_Error_fix_09
  10. Check the settings, then click Finish to import the certificate.
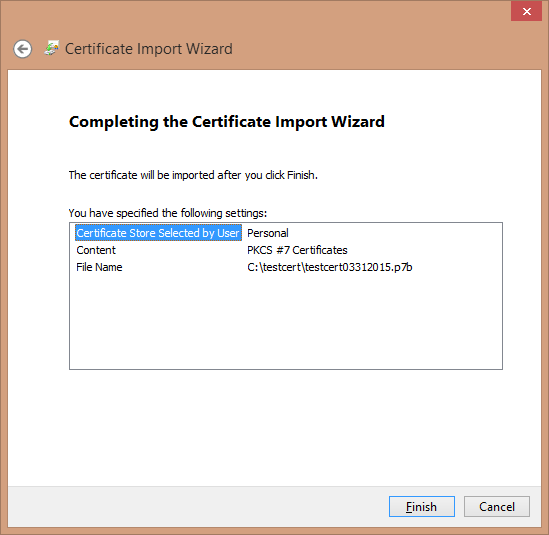
    IIS7_No_Private_Key_Error_fix_10_11_12.

Capture the Serial Number

  1. Double-click to open the certificate, then select the “Details” tab to find and capture the serial number.
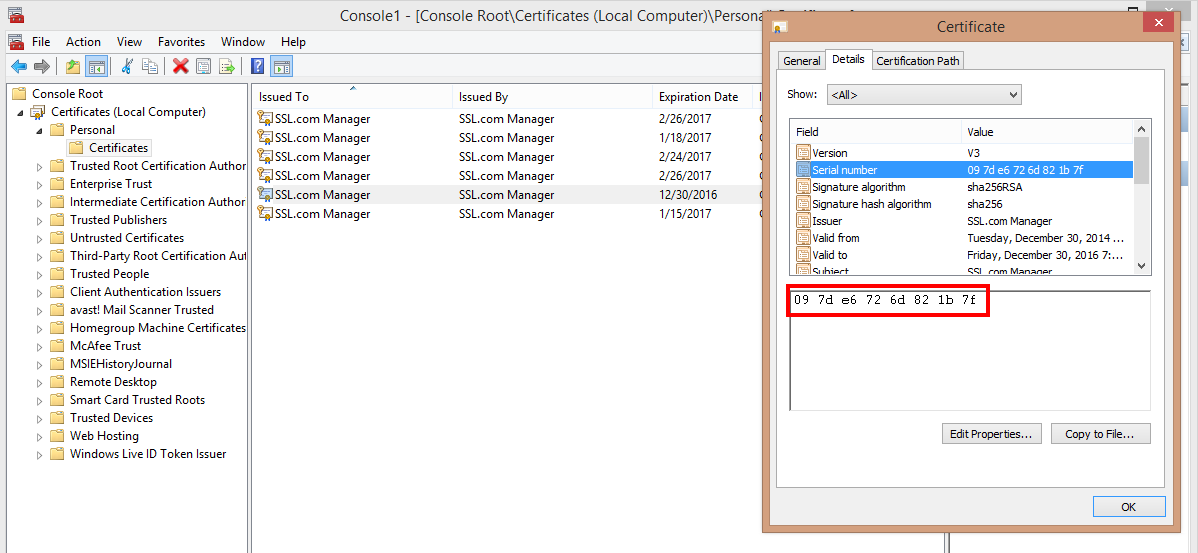
    IIS7_No_Private_Key_Error_fix_11_1

Run the certutil Program

  1. In order to perform the next step, you will need to open a command line session with administrator privileges. The most straightforward way to do this is to perform a search for “cmd”, then right-click the cmd icon and select “Run as administrator”. (Choose “Yes” if asked if you wish to allow this program to make changes on the computer.)
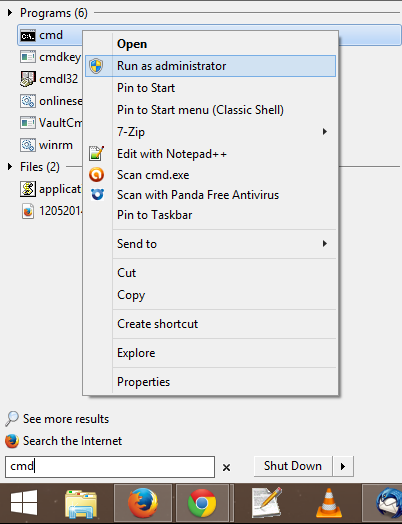
    IIS7_No_Private_Key_Error_fix_12
  2. At the command line, enter the following command, using your captured serial number:
    certutil -repairstore my "PLACE_SERIAL_NUMBER_HERE"
    Make certain and place the serial number between the quote marks as shown.  **It is best to actually type the serial number as the paste function can sometimes lose a character in the cmd window.
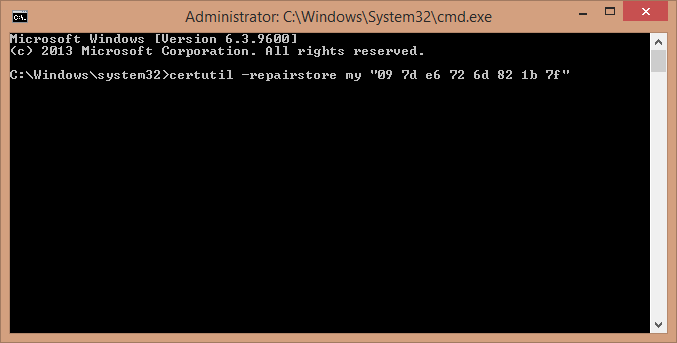
    IIS7_No_Private_Key_Error_fix_13
  3. If successful, this command will return some information about the certificate and a confirmation message.
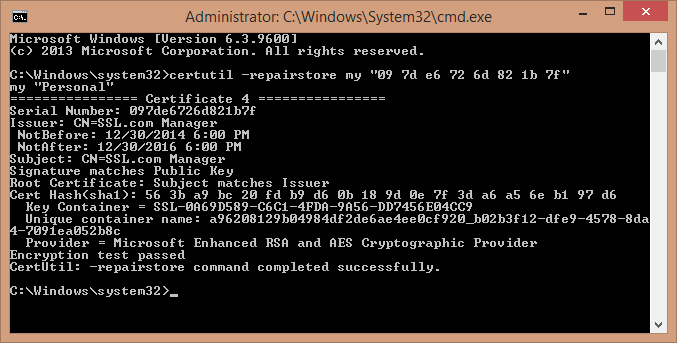
    IIS7_No_Private_Key_Error_fix_14
  4. Close the command session and refresh MMC.
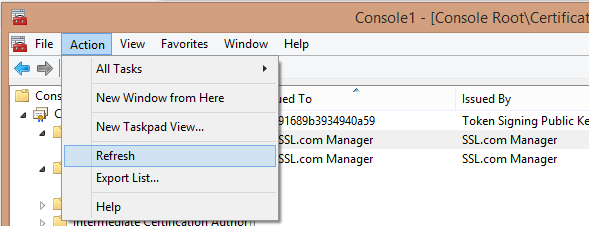
    IIS7_No_Private_Key_Error_fix_15

Export the Corrected Certificate

  1. Right-click the certificate and select “All tasks > Export” to open the Certificate Export Wizard.
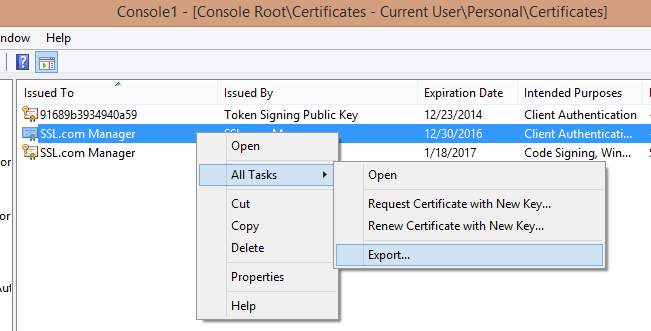
    IIS7_No_Private_Key_Error_fix_16
  2. After clicking through the Wizard’s welcome page, make sure that the option is set to “Yes, export the private key” and click Next.
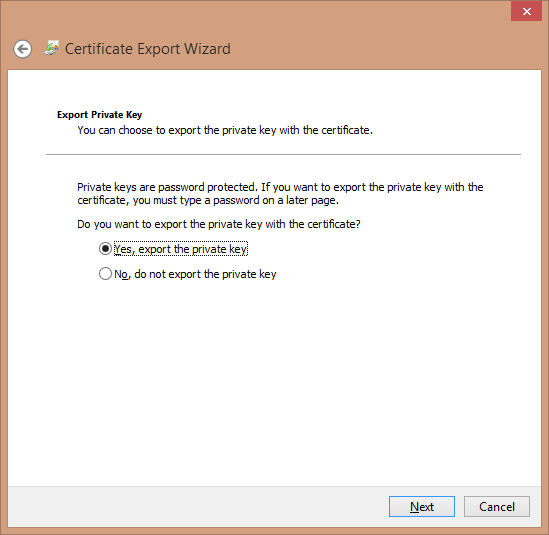
    IIS7_No_Private_Key_Error_fix_17_1
  3. Choose the format for the exported certificate (here, a PKCS # 12 -encoded, or .PFX file). Make sure to check the boxes to include all certificates in the path and to export all extended properties, then click Next.
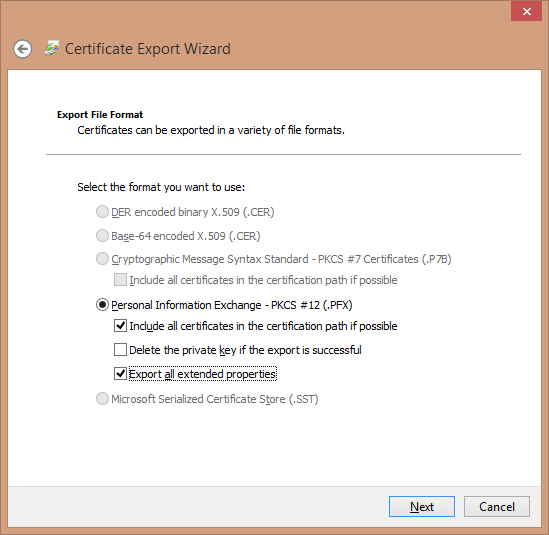
    IIS7_No_Private_Key_Error_fix_18_1
  4. You will be prompted for a password to protect this certificate bundle (a good idea, since it incorporates your private key). Create and confirm your password, then click Next.
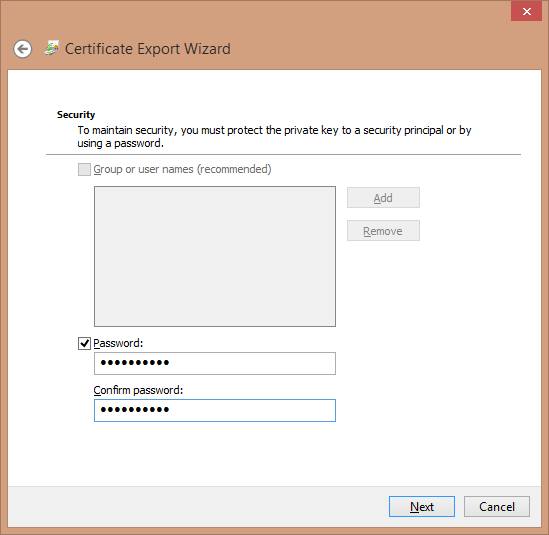
    IIS7_No_Private_Key_Error_fix_19_1
  5. Select the name and location of the file you are exporting. You may browse to a location you prefer – make sure to save the file with the .pfx extension.
    Note: Including the date is a good way to differentiate this certificate file from other ones.
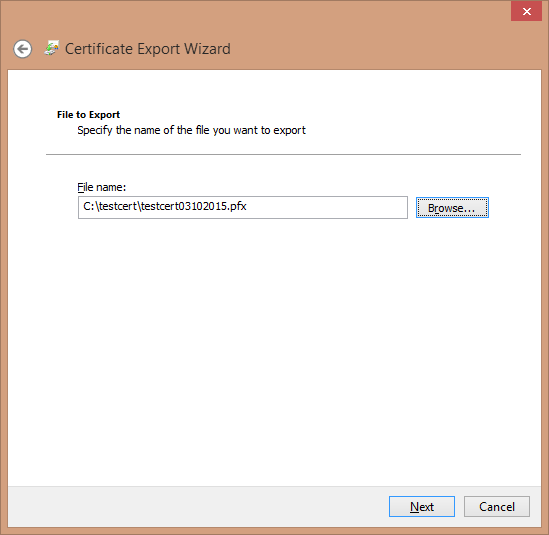
    IIS7_No_Private_Key_Error_fix_20_1
  6. Review the information. If this all looks correct, click Finish.

    IIS7_No_Private_Key_Error_fix_21_1
  7. You will receive confirmation that the export was successful.

    IIS7_No_Private_Key_Error_fix_22

Re-importing the Certificate with IIS

You will now have a file you can re-import via IIS without throwing the “No Private Key” error. SSL.com has general instructions on how to do this in a separate article here. For our purposes, just remember to choose “Import” instead of “Complete Certificate Request” when processing this certificate and to enter the password when prompted.
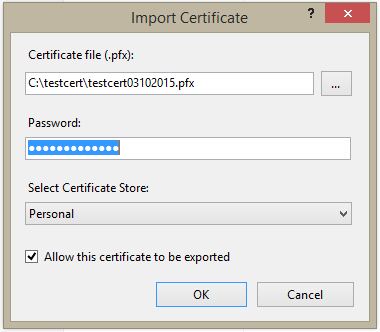
IIS7_No_Private_Key_Error_fix_iis_1
Remember also to set the Type to “https” and the Port to “443” (unless otherwise instructed by your network administrator) when binding the certificate to the site.
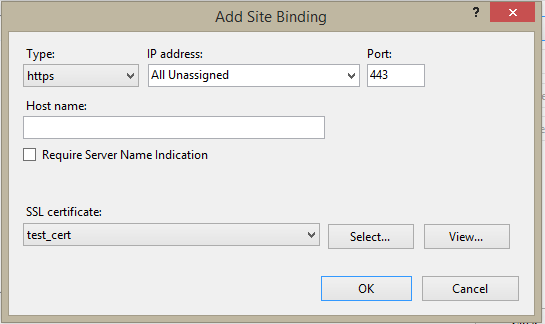
IIS7_No_Private_Key_Error_fix_iis_2

Group Expiration on Active Directory (2016)

Active Directory is the base technology used to provide authentication and authorization services to Microsoft and third-party applications. Microsoft has been focusing more on the development of Active Directory and has been introducing new features in every new version of Windows Server. We saw enhancements in Active Directory running on Windows Server 2012 such as applying virtual snapshots to a domain controller, domain controller cloning feature, Active Directory recycle bin, fine-grained password policies (referred to as just FGPP), dynamic access control, and many other features. Windows Server 2016 brings some new and exciting features for Active Directory. The main feature that was introduced in Windows Server 2016 is the Group membership expiration, which is the focus of this article.

Group membership expiration

One of the notable features added to Windows Server 2016 Active Directory is “group membership expiration.” In earlier versions of Active Directory, if you added users to a security group temporarily, you had to keep track of users to be removed from the security group to avoid any potential harm and to ensure users are removed from the security groups for compliance purposes. For example, if you add someone to the domain admins security group to perform some admin tasks in Active Directory for a certain period of time and if you forgot to remove the user from the group, the user may have unauthorized access to the Active Directory and other systems in the production environment. If you needed to perform removal of several users from the security group, you had to design a script that would process the users stored in a CSV file and then remove the users from the security group. But group membership expiration can help you remove users from the security group automatically. It allows you to add a user to a security group for a certain period of time. This feature is quite handy if you need someone to be part of a security group for a limited time, for example installing an application and to perform some maintenance tasks on the systems.

Requirements for using group membership expiration

There are a few requirements that you need to meet before group membership expiration feature can be used as listed below:

First, make sure to raise the functional level to Windows Server 2016. It may be difficult for many organizations to raise functional levels to Windows Server 2016 due to the fact most of the production environments are still running Windows Server 2012 R2 and earlier versions of domain controllers. Note that raising the function level to Windows Server 2016 will disable the ability to install earlier versions of domain controllers. You can verify the current functional level by executing the PowerShell command below:


Get-Domain | Select DomainMode
Get-ADForest | Select ForestMode


The group membership expiration feature was introduced as part of the PAM (privileged access management) feature. To ensure PAM is enabled, run this PowerShell command:


Get-ADOptionalFeature “Privileged Access Management Feature”


Once privileged access management is enabled, you can use simple PowerShell commands to add an expiration date for a user account as shown below:


$TTL = New-TimeSpan –Minutes 30
Add-ADGroupMember -Identity “Domain Admins” -Members TestUser -MemberTimeToLive $TTL


As you can see in the above commands, the first command creates a time entry, the second command uses Add-ADGroupMember PowerShell cmdlet to add “TestUser” to domain admins security group, and then also specify the time when the user needs to be removed from the security group. The second command uses “-MemberTimeToLive” property to set the expiration time for the user. When the time expires, the user “TestUser” is automatically removed from the domain admins security group.

The group membership expiration feature is quite useful when dealing with contractors, vendors, temporary employees, and anyone else who needs temporary access to Active Directory and systems connected to the production environment. The group membership expiration feature will surely avoid any security risks in the production environment.

Time synchronization enhancements

Time synchronization throughout the Active Directory forest is necessary considering the fact Kerberos authentication protocol requires systems in sync before an identity can be authenticated. Windows Server 2016 adds new enhancements to the time synchronization algorithm such as making sure frequent time adjustments are processed, eliminating any rounding errors that generally occur when synchronizing time with a PDC or a domain controller. Accuracy has been improved from 100s of milliseconds to the 10s of microseconds.