Domain Name
Start -> Run -> CMD
nslookup
set type=all
_ldap._tcp.dc._msdcs.DOMAIN_NAME
Start -> Run -> CMD
nslookup
set type=all
_ldap._tcp.dc._msdcs.DOMAIN_NAME
Databricks is a unified analytics platform that helps organizations to solve their most challenging data problems. It is a cloud-based platform that provides a single environment for data engineering, data science, and machine learning.
Databricks offers a wide range of features and capabilities, including:
Databricks is a popular choice for organizations of all sizes. It is used by some of the world's largest companies, such as Airbnb, Spotify, and Uber.
Here are some of the benefits of using Databricks:
If you are looking for a unified analytics platform that can help you to solve your most challenging data problems, then Databricks is a good choice.
Here are some of the use cases for Databricks:
If you are interested in learning more about Databricks, I recommend that you visit the Databricks website.
A data catalog is a system that collects and organizes metadata about data assets. It provides a central repository for information about the data, such as its source, format, and usage. Data catalogs can be used to help people find and use the data they need, and to improve the overall management of data assets.
Here are some of the benefits of using a data catalog:
There are two main types of data catalogs:
Data catalogs can be implemented using a variety of technologies, such as Hadoop, Hive, and Spark. The best technology for your organization will depend on your specific needs and requirements.
If you are considering implementing a data catalog in your organization, I recommend that you do the following:
By following these steps, you can implement a data catalog in your organization and reap the benefits that it has to offer.
Here is an example of a kadm5.acl file:
*/admin@ATHENA.MIT.EDU    *                               # line 1
joeadmin@ATHENA.MIT.EDU   ADMCIL                          # line 2
joeadmin/*@ATHENA.MIT.EDU i   */root@ATHENA.MIT.EDU       # line 3
*/root@ATHENA.MIT.EDU     ci  *1@ATHENA.MIT.EDU           # line 4
*/root@ATHENA.MIT.EDU     l   *                           # line 5
sms@ATHENA.MIT.EDU        x   * -maxlife 9h -postdateable # line 6
(line 1) Any principal in the ATHENA.MIT.EDU realm with an admin instance has all administrative privileges except extracting keys.
(lines 1-3) The user joeadmin has all permissions except extracting keys with his admin instance, joeadmin/admin@ATHENA.MIT.EDU (matches line 1). He has no permissions at all with his null instance, joeadmin@ATHENA.MIT.EDU (matches line 2). His root and other non-admin, non-null instances (e.g., extra or dbadmin) have inquire permissions with any principal that has the instance root (matches line 3).
(line 4) Any root principal in ATHENA.MIT.EDU can inquire or change the password of their null instance, but not any other null instance. (Here, *1 denotes a back-reference to the component matching the first wildcard in the actor principal.)
(line 5) Any root principal in ATHENA.MIT.EDU can generate the list of principals in the database, and the list of policies in the database. This line is separate from line 4, because list permission can only be granted globally, not to specific target principals.
(line 6) Finally, the Service Management System principal sms@ATHENA.MIT.EDU has all permissions except extracting keys, but any principal that it creates or modifies will not be able to get postdateable tickets or tickets with a life of longer than 9 hours.
A change advisory board (CAB) is a group of people who meet regularly to review and approve changes to an organization's IT infrastructure. The CAB helps to ensure that changes are made in a controlled and orderly manner, and that they do not impact the business negatively.
The importance of a CAB can be summarized as follows:
Overall, the CAB is an important part of any organization's change management process. By ensuring that changes are reviewed and approved by a group of experts, the CAB helps to improve the quality, efficiency, and success of changes.
Here are some of the benefits of having a CAB:
If you are considering implementing a CAB in your organization, I recommend that you do the following:
By following these steps, you can ensure that your CAB is successful.
Apache Zeppelin(https://zeppelin.incubator.apache.org/) is a web-based notebook that enables interactive data analytics. You can make data-driven, interactive and collaborative documents with SQL, Scala and more.
This document describes the steps you can take to install Apache Zeppelin on a CentOS 7 Machine.
Steps
Note: Run all the commands as Root
Configure the Environment
Install Maven (If not already done)
cd /tmp/
wget https://archive.apache.org/dist/maven/maven-3/3.1.1/binaries/apache-maven-3.1.1-bin.tar.gz
tar xzf apache-maven-3.1.1-bin.tar.gz -C /usr/local
cd /usr/local
ln -s apache-maven-3.1.1 maven
Configure Maven (If not already done)
#Run the following
export M2_HOME=/usr/local/maven
export M2=${M2_HOME}/bin
export PATH=${M2}:${PATH}
Note: If you were to login as a different user or logout these settings will be whipped out so you won’t be able to run any mvn commands. To prevent this, you can append these export statements to the end of your ~/.bashrc file:
#append the export statements
vi ~/.bashrc
#apply the export statements
source ~/.bashrc
Install NodeJS
Note: Steps referenced from https://nodejs.org/en/download/package-manager/
curl --silent --location https://rpm.nodesource.com/setup_5.x | bash -
yum install -y nodejs
Install Dependencies
Note: Used for Zeppelin Web App
yum install -y bzip2 fontconfig
Install Apache Zeppelin
Select the version you would like to install
View the available releases and select the latest:
https://github.com/apache/zeppelin/releases
Override the {APACHE_ZEPPELIN_VERSION} placeholder with the value you would like to use.
Download Apache Zeppelin
cd /opt/
wget https://github.com/apache/zeppelin/archive/{APACHE_ZEPPELIN_VERSION}.zip
unzip {APACHE_ZEPPELIN_VERSION}.zip
ln -s /opt/zeppelin-{APACHE_ZEPPELIN_VERSION-WITHOUT_V_INFRONT} /opt/zeppelin
rm {APACHE_ZEPPELIN_VERSION}.zip
Get Build Variable Values
Get Spark Version
Running the following command
spark-submit --version
Override the {SPARK_VERSION} placeholder with this value.
Example: 1.6.0
Get Hadoop Version
Running the following command
hadoop version
Override the {HADOOP_VERSION} placeholder with this value.
Example: 2.6.0-cdh5.9.0
Take the this value and get the major and minor version of Hadoop. Override the {SIMPLE_HADOOP_VERSION} placeholder with this value.
Example: 2.6
Build Apache Zeppelin
Update the bellow placeholders and run
cd /opt/zeppelin
mvn clean package -Pspark-{SPARK_VERSION} -Dhadoop.version={HADOOP_VERSION} -Phadoop-{SIMPLE_HADOOP_VERSION} -Pvendor-repo -DskipTests
Note: this process will take a while
Configure Apache Zeppelin
Base Zeppelin Configuration
Setup Conf
cd /opt/zeppelin/conf/
cp zeppelin-env.sh.template zeppelin-env.sh
cp zeppelin-site.xml.template zeppelin-site.xml
Setup Hive Conf
# note: verify that the path to your hive-site.xml is correct
ln -s /etc/hive/conf/hive-site.xml /opt/zeppelin/conf/
Edit zeppelin-env.sh
Uncomment export HADOOP_CONF_DIR
Set it to export HADOOP_CONF_DIR=“/etc/hadoop/conf”
Starting/Stopping Apache Zeppelin
Start Zeppelin
/opt/zeppelin/bin/zeppelin-daemon.sh start
Restart Zeppelin
/opt/zeppelin/bin/zeppelin-daemon.sh restart
Stop Zeppelin
/opt/zeppelin/bin/zeppelin-daemon.sh stop
Viewing Web UI
Once the zeppelin process is running you can view the WebUI by opening a web browser and navigating to:
http://{HOST}:8080/
Note: Network rules will need to allow this communication
Runtime Apache Zeppelin Configuration
Further configurations maybe needed for certain operations to work
Configure Hive in Zeppelin
Open the cloudera manager and get the public host name of the machine that has the HiveServer2 role. Identify this as HIVESERVER2_HOST
Open the Web UI and click the Interpreter tab
Change the Hive default.url option to: jdbc:hive2://{HIVESERVER2_HOST}:10000
Issue:
You would like to verify the integrity of your downloaded files.
Solution:
WINDOWS:
Download the latest version of WinMD5Free.
Extract the downloaded zip and launch the WinMD5.exe file.
Click on the Browse button, navigate to the file that you want to check and select it.
Just as you select the file, the tool will show you its MD5 checksum.
Copy and paste the original MD5 value provided by the developer or the download page.
Click on Verify button.
MAC:
Download the file you want to check and open the download folder in Finder.
Open the Terminal, from the Applications / Utilities folder.
Type md5 followed by a space. Do not press Enter yet.
Drag the downloaded file from the Finder window into the Terminal window.
Press Enter and wait a few moments.
The MD5 hash of the file is displayed in the Terminal.
Open the checksum file provided on the Web page where you downloaded your file from.
The file usually has a .cksum extension.
NOTE: The file should contain the MD5 sum of the download file. For example: md5sum: 25d422cc23b44c3bbd7a66c76d52af46
Compare the MD5 hash in the checksum file to the one displayed in the Terminal.
If they are exactly the same, your file was downloaded successfully. Otherwise, download your file again.
LINUX:
Open a terminal window.
Type the following command: md5sum [type file name with extension here] [path of the file] -- NOTE: You can also drag the file to the terminal window instead of typing the full path.
Hit the Enter key.
You’ll see the MD5 sum of the file.
Match it against the original value.
Summary
After changing ‘Authentication Backend Order’ to external, users cannot login. This guide explains how to revert back to default behaviour, authenticating through database first.
Symptoms
Users cannot login to Cloudera Manager
Conditions
Cloudera Manager boots up
Login page accessible through the browser
External authentication is enabled (LDAP, LDAP with TLS = LDAPS)
Authentication Backend Order, was changed to external authentication.
Cause
Cloudera Manager is trying to connect to LDAP If auth_backend_order is set to external only or external and DB. A misconfiguration with LDAP or External authentication is causing Cloudera Manager Server to unable to map users credential appropriately.
Instructions
Please follow the instructions to fix this.
Note: Take backup of the SCM database [0]
By deleting auth_backend_order order config Cloudera Manager falls back to the DB_ONLY auth backend and will not try to connect to the LDAP server.
Step 1:
Stop the Cloudera Manager server
$sudo service cloudera-scm-server stop
Confirm the auth_backend_order is other than non-default ie: not DB_ONLY or nothing.
Step – 2:
Run this query in the Cloudera Manager schema to reset the Authentication Backend Order configuration:
Connect mysql DB:
./mysql -u root -p
mysql>use scm;
mysql> select ATTR, VALUE from CONFIGS where ATTR = “auth_backend_order”;
Delete the auth_backend_order attribute from Cloudera Manager database (this will revert to default behavior). Run below query in the Cloudera Manager schema to reset the Authentication Backend Order configuration:
mysql> delete from CONFIGS where ATTR = “auth_backend_order” and SERVICE_ID is null;
Step – 3:
Start the Cloudera Manager server
$sudo service cloudera-scm-server start
Try to login now with admin user.
Reference
https://www.devopsbaba.com/cannot-login-to-cloudera-manager-with-ldap-ldaps-enabled/
Below steps have been tried on 2 different Windows 10 laptops, with two different Spark versions (2.x.x) and with Spark 3.1.2.

PySpark requires Java version 7 or later and Python version 2.6 or later.
To check if Java is already available and find it’s version, open a Command Prompt and type the following command.
java -versionIf the above command gives an output like below, then you already have Java and hence can skip the below steps.
java version "1.8.0_271"
Java(TM) SE Runtime Environment (build 1.8.0_271-b09)
Java HotSpot(TM) 64-Bit Server VM (build 25.271-b09, mixed mode)
Java comes in two packages: JRE and JDK. Which one to use between the two depends on whether you want to just use Java or you want to develop applications for Java.
You can download either of them from the Oracle website.
Do you want to run Java™ programs, or do you want to develop Java programs? If you want to run Java programs, but not develop them, download the Java Runtime Environment, or JRE™
If you want to develop applications for Java, download the Java Development Kit, or JDK™. The JDK includes the JRE, so you do not have to download both separately.
For our case, we just want to use Java and hence we will be downloading the JRE file.
1. Download Windows x86 (e.g. jre-8u271-windows-i586.exe) or Windows x64 (jre-8u271-windows-x64.exe) version depending on whether your Windows is 32-bit or 64-bit
2. The website may ask for registration in which case you can register using your email id
3. Run the installer post download.
Note: The above two .exe files require admin rights for installation.
In case you do not have admin access to your machine, download the .tar.gz version (e.g. jre-8u271-windows-x64.tar.gz). Then, un-gzip and un-tar the downloaded file and you have a Java JRE or JDK installation.
You can use 7zip to extract the files. Extracting the .tar.gz file will give a .tar file- extract this one more time using 7zip.
Or you can run the below command in cmd on the downloaded file to extract it:
tar -xvzf jre-8u271-windows-x64.tar.gzMake a note of where Java is getting installed as we will need the path later.
2. Python
Use Anaconda to install- https://www.anaconda.com/products/individual
Use below command to check the version of Python.
python --versionRun the above command in Anaconda Prompt in case you have used Anaconda to install it. It should give an output like below.
Python 3.7.9Note: Spark 2.x.x don’t support Python 3.8. Please install python 3.7.x. For more information, refer to this stackoverflow question. Spark 3.x.x support Python 3.8.
Following steps can be scripted as a batch file and run in one go. Script has been provided after the below walkthrough.
Download the required spark version file from the Apache Spark Downloads website. Get the ‘spark-x.x.x-bin-hadoop2.7.tgz’ file, e.g. spark-2.4.3-bin-hadoop2.7.tgz.
Spark 3.x.x also come with Hadoop 3.2 but this Hadoop version causes errors when writing Parquet files so it is recommended to use Hadoop 2.7.
Make corresponding changes to remaining steps for the chosen spark version.
You can extract the files using 7zip. Extracting the .tgz file will give a .tar file- extract this one more time using 7zip. Or you can run the below command in cmd on the downloaded file to extract it:
tar -xvzf spark-2.4.3-bin-hadoop2.7.tgzCreate a folder for spark installation at the location of your choice. e.g. C:\spark_setup.
Extract the spark file and paste the folder into chosen folder: C:\spark_setup\spark-2.4.3-bin-hadoop2.7
From this GitHub repository, download the winutils.exe file corresponding to the Spark and Hadoop version.
We are using Hadoop 2.7, hence download winutils.exe from hadoop-2.7.1/bin/.
Copy and replace this file in following paths (create \hadoop\bin directories)
C:\spark_setup\spark-2.4.3-bin-hadoop2.7\binC:\spark_setup\spark-2.4.3-bin-hadoop2.7\hadoop\binWe have to setup below environment variables to let spark know where the required files are.
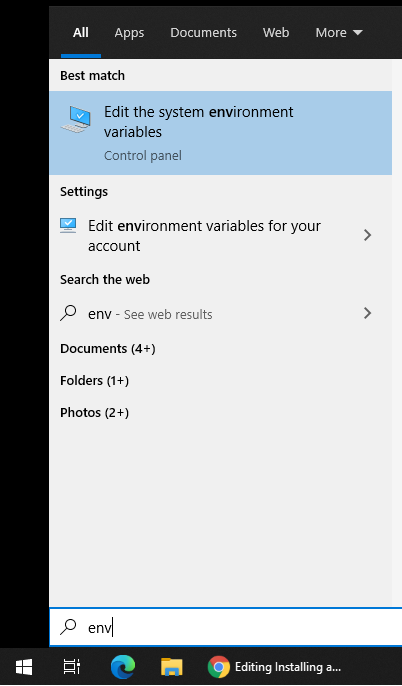
In Start Menu type ‘Environment Variables’ and select ‘Edit the system environment variables’
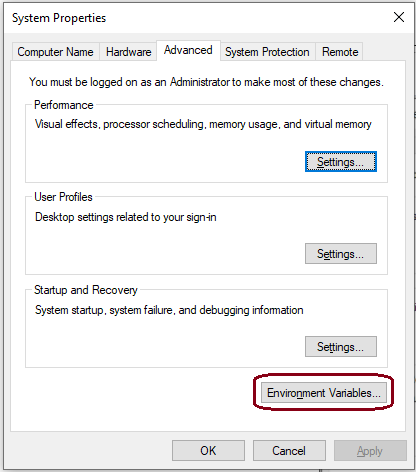
Click on ‘Environment Variables…’
Add ‘New…’ variables
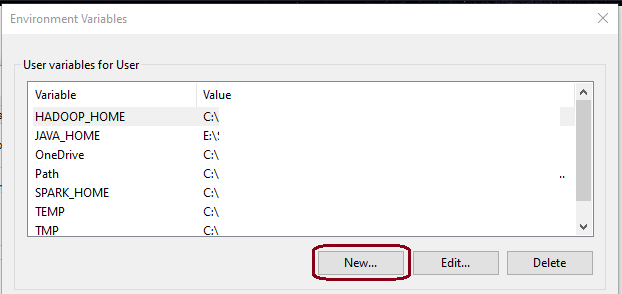

SPARK_HOMEC:\spark_setup\spark-2.4.3-bin-hadoop2.7 (path to setup folder)HADOOP_HOMEC:\spark_setup\spark-2.4.3-bin-hadoop2.7\hadoop%SPARK_HOME%\hadoopJAVA_HOMEC:\Program Files\Java\jre1.8.0_271.tar.gz version, set the path to the location where you extracted it.PYSPARK_PYTHONpython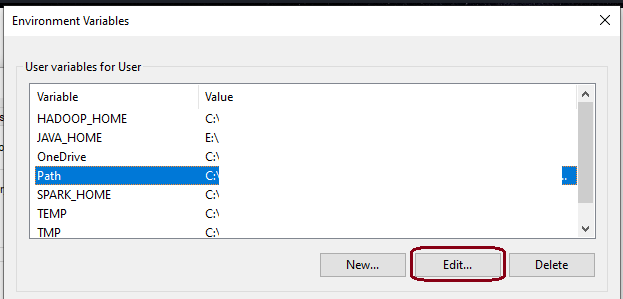
Click on ‘New’ and add the spark bin path, e.g. C:\spark_setup\spark-2.4.3-bin-hadoop2.7\bin OR %SPARK_HOME%\bin
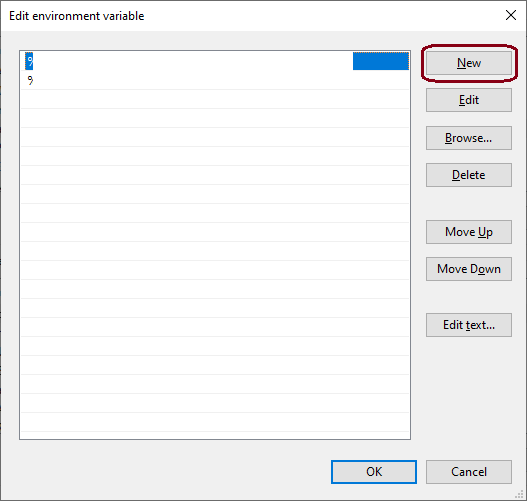
All required Environment variables have been set.
Optional variables: Set below variables if you want to use PySpark with Jupyter notebook. If this is not set, PySpark session will start on the console.
PYSPARK_DRIVER_PYTHONjupyterPYSPARK_DRIVER_PYTHON_OPTSnotebookEdit and use below script to (almost) automate PySpark setup process.
Steps that aren’t automated: Java & Python installation, and Updating the ‘Path’ variable.
Install Java & Python before, and edit the ‘Path’ variable after running the script, as mentioned in the walkthrough above.
Make changes to the script for the required spark version and the installation paths. Save it as a .bat file and double-click to run.
You might have to restart your machine post above steps in case below commands don’t work.
Each command to be run in a separate Anaconda Prompt
spark-class.cmd org.apache.spark.deploy.master.Master -h 127.0.0.1
spark-class.cmd org.apache.spark.deploy.worker.Worker spark://127.0.0.1:7077
SparkUI will show the worker status.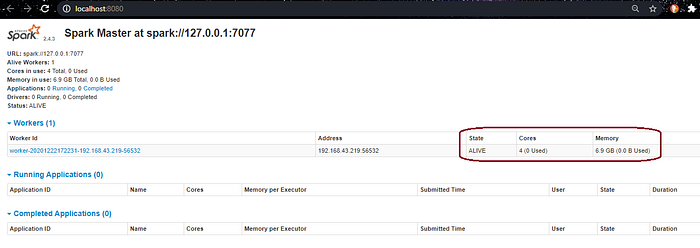
3. PySpark shellpyspark --master spark://127.0.0.1:7077 --num-executors 1 --executor-cores 1 --executor-memory 4g --driver-memory 2g --conf spark.dynamicAllocation.enabled=false
Adjust num-executors, executor-cores, executor-memory and driver-memory as per machine config. SparkUI will show the list of PySparkShell sessions.
Activate the required python environment in the third anaconda prompt before running the above pyspark command.
The above command will open Jupyter Notebook instead of pyspark shell if you have set the PYSPARK_DRIVER_PYTHON and PYSPARK_DRIVER_PYTHON_OPTS Environment variables as well.
Run below command to start pyspark (shell or jupyter) session using all resources available on your machine. Activate the required python environment before running the pyspark command.
pyspark --master local[*]
Please let me know in comments if any of the steps give errors or you face any kind of issues.